Android
being an Open Source operating system for mobile phones, offers
limitless possibilities of optimization and customization as per your
requirements. Half the charm of an Android phone lies in the root-based
apps, beautiful mods and patches, and custom ROMs. If you have not
rooted your phone yet, believe me you are not getting the most out of
it. Rooting offers many advantages indeed but, at the same time it is
also a little risky as it breaks into the wall of security build by the
operating system.
According to a
survey, 80% of Android phone users live happy with an unrooted device
and the reasons for this are various- some people think of it as a sort
of criminal activity, some are afraid of losing warranty, some are
afraid of bricking their phone, while most people do not even know about
the existence of a term like “rooting”. If you are one who has enclosed
himself in side that great wall of security and have doubt in mind
related to rooting, do not forget to read the following article:
Anyways,
the procedures like rooting and installing a custom ROM is a bit risky
and it’s true, but if you go through it carefully, no harm will ever
done to your Android device. People brick their phone because they make
some mistake. That’s the way accidents happen! As an Android blogger, I
have to root, flash stock and custom ROMs, install mods and patches
almost everyday. And believe me all my device are pretty healthy and
sound. If you understand things, take precautions, create backups and do
things carefully, you’ll never be caught into an uncomfortable
situation.
Here are a few tips that
that will help you keep things under your control and you will be able
to not only keep all your data safe, but also restore your device to its
normal condition.
Got TWRP Recovery on Your Device?
Do
you think you are well familiar with all the features, functions and
possibilities of the TWRP Recovery? Think again! Read our detailed and
in-depth introduction to the Team Win Recovery Project: Click Here
Ensure Decent Battery Level

Whenever
you have to install a custom ROM or mod or mod on your phone, try to be
ready for the worst situations. Just imagine you are installing a ROM
and your phones turns off in the middle of things due to low battery!
You will have to charge the battery with an external charger because
your device will not be able to charge the battery because it does not
have any ROM that makes this function work. In such a situation, you
will not be able to restart the procedure or even restore from a backup
Therefore, it very important that your phone is amply charged before you
set out on the adventure.
Backup Your Apps, Contacts, Messages, etc.
Whether
you have rooted your phone or not, always backup your apps, contacts,
call-log, messages, bookmarks, calendar entries, etc. The best way is to
schedule regular backups, preferably to external storage of your device
and your computer. Here are some nice free apps that will make this task easy for you.
Put Your Phone in Debugging Mode
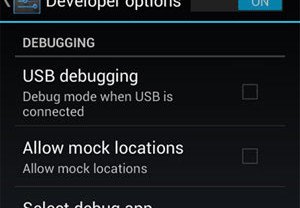
The term “debugging”
is used in connection with development. Putting your Android device in
debugging mode prepares it for direct connection with your computer via a
USB cable without notification or read log data. Flashing/installing
anything that does not come under official method, might be regarded as a
development activity. It’s another thing that you did not developed the
ROM you are going to install, but still it is a work of custom
development. That’s is why, whenever you perform any such task, it is
highly recommended that you turn on the USB Debugging mode from Developer Options under Settings of your device. On Android phones with Jelly Bean 4.2 and higher, the Developer Options are hidden by default and can be made to show by tapping 7 times on “Build Version” from Settings> About.
Further,
you should also install the appropriate USB Drivers on your computer as
you can need them anytime. To download the compatible USB Drivers for
your phone/manufacturer, visit our USB drivers collection page.
Backup Your Phone’s IMEI (Samsung Users Only)
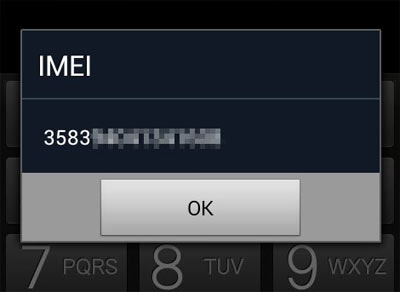
When
you install a custom ROM on you phone, sometimes it happens that the
folder that stores your phone’s IMEI (International Mobile Equipment
Identity) number is wiped. As a result, your phone’s IMEI number is lost
it does not receive network signal. To avoid this happen to your phone,
do not forget to backup the “efs” partition.
To backup your Samsung Galaxy phone’s IMEI or EFS data, read our guide by clicking the following link:How to Backup and Restore EFS Data / IMEI on Samsung Galaxy Devices
In case you have a low/mid range Galaxy device from Samsung, you can use an app called Galaxy ToolBox for the purpose.
Download: Galaxy ToolBox.apk (187.15 KB)
Enter Recovery Mode Easily:
If
you are a hard-core Android enthusiast who likes to play with new ROMs
and mods every now and then, be careful or you might damage the hardware
keys of your Android phone. Since booting into recovery mode of a phone
or tablet requires hard-pressing of certain combination of hardware
keys, doing it frequently can have a negative effect on the functioning
of these keys. I have experience it myself when I had a Galaxy S.
Fortunately, there are several apps that can make booting into download,
bootloader or recovery mode very easy without being cruel to the poor
hardware keys.
Here are some good free apps
for you that will let you do this without touching the hard keys. If
you have installed a custom ROM, you need not install any such app
separately as most ROM developers integrate the boot options in the ROM
itself. Besides, we have an vast collection of methods of entering
Fastboot, Bootloader, Download and Recovery modes on most Android
devices.
Backup the Complete ROM (Important)
Being
able to install a custom ROM on your Android phone means that you have
installed custom recovery like ClockworkMod or TWRP on your Android
device. Well, having a custom recovery on any phone is a great
advantage. It can perform all tasks done by stock recovery while adding
lots of other useful options.
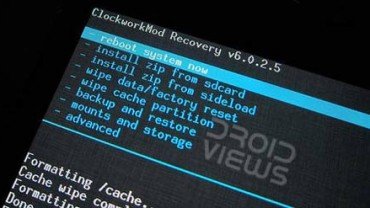
One
such great feature is its ability to backup the whole ROM, custom or
stock, on your phone’s internal or external storage. You can back as
many ROMs as your phone’s storage can afford. I strongly recommend that
you always keep a backup of your phone’s original/stock ROM. Before you install a new custom ROM, always create a backup of your current ROM. Scroll down to the “backup and restore”
option and backup the ROM to the internal or external storage of you
device. If you select “backup”, the ROM will be saved to internal
storage. To save it to external SD card, select “backup to external
sdcard” option.
All backed up ROMs are saved on a folder called “clockworkmod” on your device’s internal or external SD card, depending on what location you chose while creating the backup.
It’s
is always better to store the backed up ROM on the external storage
because sometimes the phone is caught in a bootloop, or the screen goes
into a frozen state, or you may experience lags, or anything, and decide
to reset/wipe your phone to get it back to normal. In doing so, all
data stored on the internal storage is deleted. In certain situations
you might have the opportunity to backup your data but in some cases you
might not be able to do that.
How to Restore a Previously Backed up ROM:
As
I said earlier, you should always keep a backed up copy of the rooted
stock ROM on the external SD card of your phone. If the phone does not
have an external SD slot, you can save the backup to the internal SD
card (not safe though). If you frequently flash an AOSP, AOKP or CM
based ROM, always keep a copy of the Google Apps flashable zip saved on
your phone.
So if you installed a custom ROM and you are having
problems with it or you just want to go back to the previous or any
backed up ROM, do this:- Boot you phone into CWM recovery mode
- “wipe data/factory reset”
- “wipe cache partition”
- Then go to “backup and restore> restore”, select the location (internal or external) of the backup.
- Select the file and confirm your choice by selecting “yes”.
So,
this was a detailed tutorial to help you land safely whenever you
install a ROM. I have tried to be inclusive but if feel that something
is missing, do not forget to share with us via comments. I believe the
tips given here will prove useful to you. Thanks for being with us! For
more Tips & Tricks on Android, take a tour of our other tutorials.
Installing a Custom ROM
Now
here is my classic way of installing a custom ROM. I recommend it to
all because it has proved perfectly successful and never hurled down my
phones into a single bootloop so far. Always follow these steps in CWM
Recovery:
- “wipe data/factory reset”
- “wipe cache partition”
- Go to advanced and “wipe dalvik cache” and “wipe battery stats”
- Go to mounts and storage and “format system”
- The go to “install zip from sdcard> choose zip from sdcard” and select the ROM file you want to install.
- In case, the developer has recommended to install GApps too, you should install it just after flashing the ROM (use Step 5).
- When it is installed, reboot the device.
Installing
a custom ROM with these wipes has a great advantages. Whenever you
flash a new ROM, install it as fresh copy. Less wipes means more chances
of old and new system files’ clash, resulting in poor performance, lags
and even a bootloop. While some enlightened giants might disapprove of
the idea of wiping the battery stats of the old ROM, I still recommend
to wipe it as it takes nothing. However, you should also listen to any
recommendations of the developer whose ROM you are going to install.
Installing Google Apps
Most
AOSP (Android Open Source Project), AOKP (Android Open Kang Project)
and CyanogenMod based ROMs do not come with the Google apps
pre-installed, so you have to install them separately. To download and
install the latest and compatible Google apps to your phone, head over
to our great collection.
Getting Signature Verification Error While Installing?
Well,
it is an uncommon situation that while installing a custom ROM on your
Android device you see installation aborted message because of Signature
Verification error. Two possible reasons for this to happen might be-
- You are trying to install a custom ROM using stock recovery that comes default with all Android phones. Remember, a custom ROM or mod requires a custom recovery like CWM or TWRP installed on it. If you are getting signature error, first of all try to find out the type of recovery your phone has. Boot into the recovery mode and read the lines on the top of the screen. If it reads “Android System Recovery”, you need to install a custom recovery first.
- The most common reason for the signature verification error while installing a ROM is a badly downloaded zip. All custom ROMs and mods for Android devices come in ZIPs that are packed with a MD5 Signature. If a downloaded zip is corrupt, it is sure to have a corrupt signature. To fix this, you can take aid of a MD5 Signature versification tool. You can also try to extract the downloaded zip on your computer. One nice quality of a ZIP archive is that it cannot be extracted properly if it is corrupt. In the case of a bad zip file, you should redownload it and try installing again.
(Status 7) Installation Aborted Error
Another instance of installation of a custom ROM or mod aborted might be due to the presence an older or incompatible version of ClockworkMod Recovery on your Android device. In such cases, you will get the following message while installing the ROM:– installing : /sdcard/xxxxxxxxx.zip
finding update package…
opening update package…
installing update…
assert failed: getprop(“ro.product.device”) == “m0″ || getprop(“ro.bulid.product”)
== “m0″ || getprop(“ro.product.device”) == “galaxy s3″ || getprop(“ro.bulid.product”)== “galaxy s3″
E: Error in /sdcard/xxxxxxxxx.zip
(status 7)
installation aborted.
To
solve this issue, you can try updating your CWM recovery. There is
another solution to this too but it’s is a little tricky. In this
method, you’ll have to edit a code line in the “updater-script” found
inside the ROM .zip file without extracting it.
If you prefer to do this, remove the following lines found at the beginning of “updater-script” found at this path: ROM.zip> META-INF> com> google> android> updater-script:
 assert(getprop("ro.product.device") == "m0" ||
 getprop("ro.build.product") == "m0" || getprop("ro.product.device") == "galaxys3" || getprop("ro.build.product") == "galaxys3");
Upgrading Custom ROM without Loosing Apps & Settings

We
always recommend a full wipe before installing a new custom ROM for
best performance. Doing this, deletes all the apps and resets the
Settings of your device and this is certainly not a desirable thing.
Nobody wants to install all apps and configure the device again and
again. While you have no option but to wipe everything with a new ROM,
things can be more pleasant if you are going to install a greater
updated version of the same ROM.
You
can upgrade your phone’s custom ROM without losing your installed apps,
data, contacts, messages, call-log and settings. Here are the steps that
you need to follow while installing the newer update package of a ROM
over an older one:
- Copy the custom ROM in zip package to your device.
- Boot the phone in CWM or TWRP recovery.
- Wipe the cache partition
- Wipe dalvik cache (found under “advanced” option in CWM)
- Then install the ROM and when it is done, wipe dalvik cache again.
- Finally, reboot the device.
Recovering from a Bootloop

Having
performed the wipes recommended above, there are nominal chances that
your phone might be stuck on the bootscreen but in case you get into
such a situation, what would you do?
Bootloop
is a situation when your phone refuses to boot/start normally due to
some system file clash or incompatible element that prevents it to boot.
To recover from a bootloop, follow the steps given at this tutorial.
How to Install a Mod or Patch or Kernel:
If
your phone is on the stock ROM with CWM installed or a custom ROM, you
can find different Mods and patches and Kernel for your device. If you
have to install any such file, do this:
- Boot your phone into CloclworkMod recovery mode.
- Again, do not forget to backup your current ROM before flashing anything on your phone.
- Go to “install zip from sdcard> choose zip from sdcard” and select the file you want to install.
- When the installation is done, go to “advanced” and “wipe dalvik cache” (not necessary in all cases).
- Finally reboot device using “reboot system now” option.
Avoid Restoring Apps & Data Backed Up on Another ROM:

Whatever
ROM we install on our device, we want it to be quickly ready with our
favorite apps and configuration. And therefore we keep all such data
backed up so that they we can restore them in case we factory reset the
device or install a new ROM. Restoring previously backed up apps or data
is a a very convenient thing as it saves a lot of time and effort but
this convenience might give rise to another inconvenient situation.
In
fact, all such backup apps (Titanium Backup, for example) are meant to
restore data on the same ROM on which the backup was created. Due to
system file discrepancies among different ROMs, restoring apps and data
this way might make your phone laggy and slow. Therefore, I recommend
you to avoid doing this for better performance of the new ROM.
Fixing Battery Heat Up and Drain:

Better
performance and battery-life is why most of us turn to custom ROMs. We
keep trying from the available ROMs and stick to one that meets up to
our expectations. Now there are two ways to find out how the battery
performs- with the help of a battery monitor app (stock or third-party)
and by taking note of the battery performance during the hours of a day.
If
you feel that your device is not yielding good battery just because the
battery monitor stats show it, you might be wrong in your judgement as
most such apps sometimes lie to us.
Remember that with any ROM installed on your Android device, you will discover two things: 1. battery heat up, and 2.
battery drain. And these issues for the most part are due to process of
your phone’s new software and battery sync. It usually requires 3-4
full-charge and discharge cycles before things go to a normal state and
after this, you will notice great improvement in battery performance.
So, do not be quick in concluding anything about battery.
Let
the battery calibrate and while you wait try one more thing. Whether
you get a new phone or new software on your old device, avoid putting
your device into charging mode frequently. Turn off the phone, plug
charger, wait till it is fully charged and then use it till it is fully
discharged. Repeating this several times will improve the battery-life
of your device. I have tested it and it really works.
No comments:
Post a Comment