watch and join lbry at https://lbry.tv/$/invite/@videogamedunkey:0
Thursday, July 29, 2021
Wednesday, July 28, 2021
How to Enable Chromecast Support in Brave (workaround)
As it stands, Brave (v0.61.51 at the time of writing this) does not have Chromecast support enabled by default. We have an open issue to surface the option to do so manually in settings which can be viewed here 4.7k.


Tuesday, July 27, 2021
Action Center Shortcut Missing - How to get Action Center shortcut back in Windows 10?
1. Make sure the Action Center shortcut is enabled
Firstly, let’s confirm that the Action Center shortcut in the notification area is enabled at all. You’ve might’ve disabled it by mistake or an update did it without your knowledge.
On the other hand, some users reported that the option was missing from the “Turn system icons on or off” menu. If that’s the case, move to the next
Here’s how to enable the Action Center shortcut in system settings:
- Press Windows key + I to open Settings.
- Choose Personalization.

- Select Taskbar from the left pane.
- Click on Turn system icons on or off.

- Make sure the Action Center icon is enabled.

Monday, July 26, 2021
Adguard ad blocker for non rooted android phones

So I got a new android phone, a xaiomi redmi note 9t, and I am currently unable to root it, so my standard plan of using AdAway (which requires root) was thwarted. I started to look around at what options I had as an unrooted adblocker. I have used DNS ad blockers in the past but I decided to try something new that I have never used before.
I stumbled my way onto Adguard and had heard good things about their windows app so I decided to give their trial a go on my Android.
So far i really like the fleshed out features of the program, I like that it has both private DNS filtering and vpn filtering. This along with it's system ad blocker seems to work great on my Android.
I now can use my Chrome browser and not be inundated with all the Google ads that they cram in every search. YouTube is also much more pleasant to watch now with out all these ads forcing their way into my eyeballs.
Many of my games that were filled with ads are now way more tolerable as well and that is all thanks to Adguard.
Their pricing plans seem pretty cheap, and I like that they offer lifetime subscriptions. Many other apps only offer a monthly charge with no way to pay for a lifetime subscription. This is were Adguard shines. I also noticed that they often have sales for Adguard, like during black Friday and such. Adguard also offers competitive and fair regional pricing so those that live in poorer countries like Russia or south America can afford a lifetime license as well.
I have 4 days left on my trial license and I really want to continue to use the app so I have found that Adguard offers ways to get a license without purchasing one. I am in the long wait-list for beta testing the android app and they hook it up to your github so you can help improve the program. They also have programs such as writing a review about Adguard and I decided to write a review as well.
If you are looking for a good ad blocker for Android and are unable to root your phone and use Root aps like AdAway, then I highly recommend trying out the free Adguard trial on your android. If you like the app and are unable to purchase it they offer free ways to get a license and i highly recommend that you take advantage of these offers.
Download the trial for Adguard here
AdGuard for Windows
AdGuard for Mac
AdGuard for Android
Also you can earn money joining the Adguard affiliate program here
Thursday, July 22, 2021
Latest MI Unlock can't detect device - MI Unlock Tool cannot detect phone - Mi unlock tool not detecting the device [FIXED]
Oh THANK GOD, I finally went past this step. Thank heavens jeez. So here's my short guide that tells what I did to resolve this problem.
Note: I have Mi Unlock tool version 2.3.803.10 (latest as of now). I'm on Windows 10 x64 build 15063.
1. Extract the zipped archive of MI Unlock tool to the root of your system drive, like C:\any_folder. I extracted it to C:\unlock, so the path of the tool's executable became "C:\unlock\miflash_unlock.exe"
2. Run MiUsbDriver.exe from the folder with as administrator and click "Install". Make sure it says "Driver installed" after that. If it already says that, hit install again just to make sure. Click "Retesting" to see if it remains the same. Close the program after.
3. Put your device into fastboot mode (make sure to turn on USB debugging and OEM unlocking in the developer options), and connect it through USB 2.0 port. (I don't know if 2.0/3.0 makes a difference but if you have 2.0 available, use it).
4. Go to device manager. Expand "Android Phone", right click "Android Bootloader Interface" and click properties. Click on "Driver" tab. See if the driver provider is "Xiaomi Technology, Inc.", driver date is "11/3/2016", and driver version is "16.0.0.0".
IF it's not, then close the properties window, right click android bootloader interface and click "Update driver". Click "Browse my computer for driver..." then "Let me pick from a list ...". Uncheck "Show compatible hardware", click "Xiaomi Technology, Inc." from the left side, then "Android Bootloader Interface" from the right and click next. After it's installed, check the properties to make sure it says what I mentioned above.
5. Go to unlock tool folder. Go to driver\win10 folder, right click android_winusb.inf and click install. You'll get operation completed successfully message.
6. Go back to unlock folder and run the tool as administrator. Now before clicking agree, click on the settings gear on the top right corner. Make sure MI Usb Driver says "Already installed". This is really important. Otherwise IT WON'T WORK. If it doesn't say that check previous steps and make sure your didn't miss any. Beyond that I have no idea.
7. Now you're good to go. Click agree, sign in and voila, your phone shall be connected, ready to unlock
via https://forum.xda-developers.com/t/resolved-mi-unlock-tool-cannot-detect-phone.3663139/
Friday, July 9, 2021
How to download high-quality music from Deezer - Getting your own ARL
If you don’t know what Deezer is, it is a french music streaming service just like Spotify and Tidal. It is free to use with ads and a lower sound quality. Because Deezer also offer a more expensice “Deezer HiFi” subscription they also store music in lossless FLAC files.
The good thing is that these files can be downloaded very easy and very fast in DRM free FLAC with just the free subscription. This can be done in many ways, but here I will explain maybe the easiest way.
Get token from cookie
Use Google Chrome and go to Deezer.com and log in to your Deezer account (Create a free account if you don’t have one already).
When logged in click F12 to open up Google Chrome’s developer settings.
Go to Application in the top-menu and expand Coockies in the left menu. Then click on https://www.doozer.com.
Find arl and copy it’s value. This can be done by marking it and right click, then Edit Value. Copy the value.
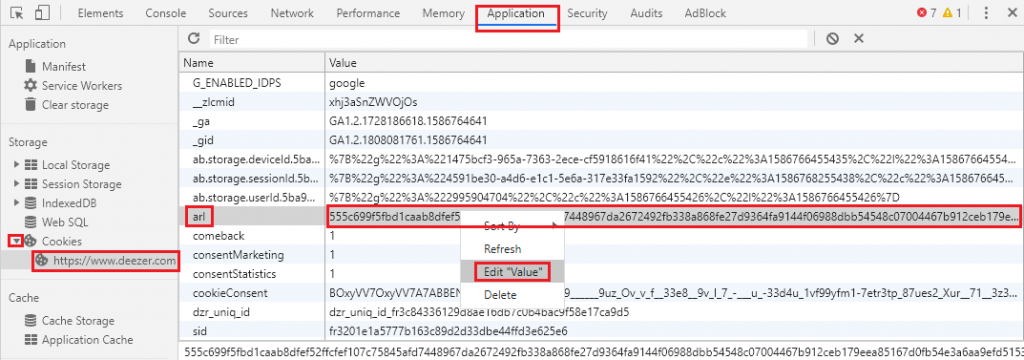
Example on token:555c699f5fbd1caab8dfef52ffcfef107c75845afd7448967da2672492fb338a868fe27d9364fa9144f06988dbb54548c07004467b912ceb179eea85167d0fb54e3a6aa9efd51535b5d7619c790461c35210c16cdd2d09b29cf29bc0953086a4
Application (Windows)
go to https://deezloader.site/download/ and download the Windows version.
Install and run the program.
Go to Settings and paste your token in the userToken field and click UPDATE USERTOKEN.
The message You are logged in as … will show. Click SAVE.
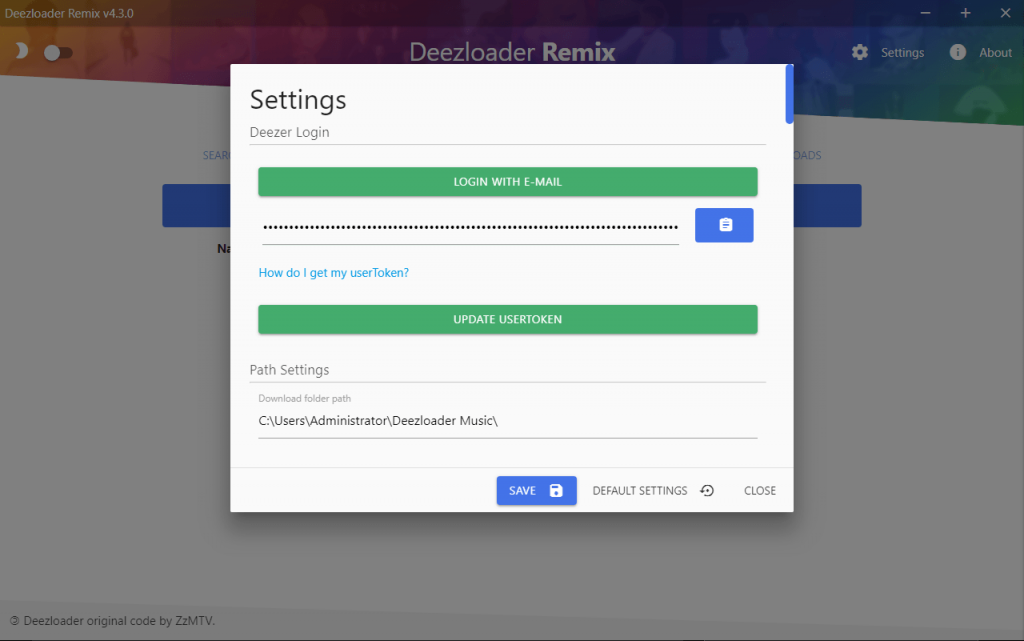
If you now go back to Settings there is a lot of settings available to customize download location and formatting.
I recommend to change Preferred bitrate from MP3 320kbps to FLAC 1411kbps if you want the best possible sound quality.
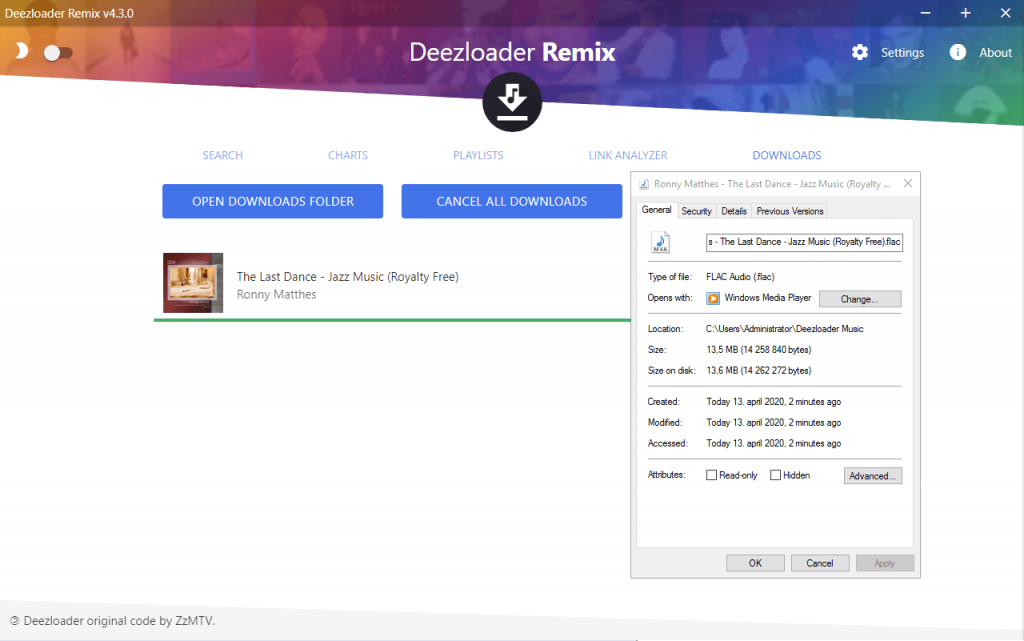
Now you can search throughout the library and download whatever you want. Enjoy!
Deezer keeps track of login session by using a cookie called ARL.
deemix uses that cookie to get the metadata that it needs to download the tracks from Deezer.
ARLs last for 3 months, after that Deezer asks you to log in again. The same method is used in deemix
Following one of the guides below you can get your own account ARL.
- Open Chrome
- Go to www.deezer.com and log into your account
- Click on the little “lock” icon next the URL
- Click on Cookies > deezer.com > cookies > arl
- Select the string next to Content, and Copy
- That’s your ARL, now you can use it in the app
- Open Chrome
- Go to www.deezer.com and log into your account
- After logging in press F12 to open up Developer Tools
- Go under the Application tab (if you don’t see it click the double arrow)
- Open the cookie dropdown
- Select www.deezer.com
- Find the
arlcookie (It should be 192 chars long) - That’s your ARL, now you can use it in the app
Here’s a video guide
- Open Firefox
- Go to www.deezer.com and log into your account
- Afer logging in press F12 to open up Developer Tools
- Go under the Storage tab (if you don’t see it click the double arrow)
- Open the cookie dropdown
- Select www.deezer.com
- Find the
arlcookie (It should be 192 chars long) - Make sure only copy the value and not the entire cookie
- That’s your ARL, now you can use it in the app
- Install firefox (if you don’t have it)
- If you have the android Deezer app, its better to uninstall it, so it doesn’t launch after login
- Get some extension to change your useragent (UserAgent Switcher)
- Get the extension “Cookie Manager”
- Change your useragent to some browser on pc (eg. Chrome on Windows 10)
- Login to deezer.com
- You need to see the home page of deezer. If you don’t see it you did something wrong.
- Go on cookie manager and search for “arl”
- Copy the value
- That’s your ARL, now you can use it in the app
IF AFTER LOGGING IN YOU CAN’T FIND THE ARL COOKIE OR YOU GET SENT TO THE PLAYSTORE THEN YOUR USERAGENT CHANGER DIDN’T WORK
Thanks to uh hey for the Android method
via https://flemmingss.com/how-to-download-high-quality-music-from-deezer/ and https://codeberg.org/RemixDev/deemix/wiki/Getting-your-own-ARL
Subscribe to:
Posts (Atom)