Pages

Monday, September 27, 2021

How to add/remove Logo Watermark on camera pictures in MIUI Redmi phones

 Add Remove Watermark in MIUI Redmi Phones

Most of the phones now come with an option to add watermark on the picture. So when you take a photo, it will carry watermark as “Show on XYZ Phone.” Some of the OEMs have this feature enabled by default, while for some you need to enable this feature. In this post, we will share how you can add/remove logo watermark on camera pictures in MIUI Redmi phones.

How to Add/Remove Camera Logo Watermark on Redmi Phones

Add Remove Watermark in MIUI Redmi Phones

Redmi Phones or phones from Xiaomi which come with MIUI has the option available under camera settings.

  1. Open the Camera App.
  2. Click on the options on the top.
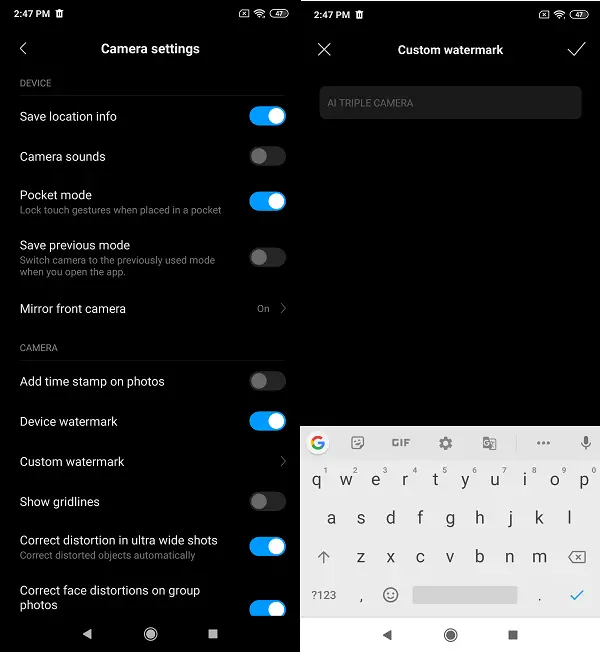
  3. Scroll to find the toggle which says “Enable/Disable Device Watermark” toggle.
  4. You can also choose to add your watermark in the form of text by using a Custom Watermark option.

You will be able to use either of the two. If you enable device watermark, then you cannot use Custom Watermark and vice versa.

Custom Watermark is useful when you share photos on Social network if you do not want pictures to get used by someone else, especially when you are known for taking awesome photos.

Most of the phones now have a similar configuration, and they are available within the camera settings. I know many people who go ahead and change it before taking any picture. Some users do not like the watermarks as it spoils the images a bit.

We hope you found the tutorial to add or remove logo watermark on camera pictures in MIUI Redmi Phones.

via https://www.thegeeksclub.com/how-to-add-remove-logo-watermark-on-camera-pictures-in-miui-redmi-phones/#:~:text=How%20to%20Add%2FRemove%20Camera%20Logo%20Watermark%20on%20Redmi,text%20by%20using%20a%20Custom%20Watermark%20option.%20

Tuesday, September 14, 2021

Completely Hide Root Using Magisk

 Ever since the introduction of Google's SafetyNet feature, it's been an ongoing battle with apps trying to detect root access. For a while, there was a lot of back and forth between Magisk and certain apps. Pokémon GO was a high profile example of an app aggressively checking for anything related to root. Luckily, Magisk has made great strides to keep apps from detecting root for good.

Pretty messy stuff if you ask me, but those days are long gone thanks to the new advancements in Magisk being able to avoid detection altogether. It's almost bulletproof now that the platform has adopted the randomized package name and Magisk Hide features. When you combine these two features, even stubborn games like Pokémon GO and Harry Potter: Wizards Unite are playable while being rooted.

Guide Update: Back in March of 2020, Google made some changes to SafetyNet that permanently trips when your bootloader is unlocked no matter what you do. This means you'll no longer pass SafetyNet successfully in most cases. Magisk Manager may report a "Success" check, but it's just spoofing your local results.

Google will now remotely check your SafetyNet status from its servers, which makes it impossible to spoof until another workaround can be found. It doesn't seem to affect all users just yet, but it might change soon to include everyone with an unlocked bootloader. We're keeping a close eye on the situation and will report any new changes if or when they should happen.

Step 1Randomize Your Package Name

The first thing you need to do on your quest for a worry-free experience is to randomize the package name of the Magisk Manager app itself. The package name is a unique identifier for each installed app, much like the MAC address or IMEI on your phone right now. By ditching the original package name for something entirely random, the offending apps and games won't know what to look for.

Open the Magisk Manager app, tap the menu icon on the left, then head to "Settings." Locate the "Hide Magisk Manager" option, then tap it once to begin the process of randomizing your package name. It will make the necessary changes in the background real fast, close the app, then reopen it once more with a newly randomized package name. Awesome!

Notice the random numbers and letters after the "com." This means the package name for Magisk has now been completely randomized as intended.

Not only does the package name get changed to something undetectable, but the app name is also altered from "Magisk Manager" to just "Manager." The keyword "Magisk" is taken out to disassociate the app with the name itself, which further enhances the ability to hide your root access. It's essential to make sure you're using this feature all the time going forward, so keep that in mind.

(1) "Magisk Manager" is the default name before randomizing the package. (2) Once the package has been randomized, you'll now see "Manager" as its new name from here on out.

Step 2Use Magisk Hide

Now that you have the first half of the changes required to make everything work, it's time to use of the Magisk Hide feature to further complement your new randomized package name. This is the other part required when trying to get all apps and games to play nicely with your root access.

Many financial or banking apps like to block root users, so that's another thing to be aware of. To get started, open the newly named "Manager" app to the main screen like before, tap the menu on the left, then head to the "Magisk Hide" entry on the list. Locate the offending app(s) that are detecting your root access and tap the dot on each one to put a checkmark on them. That's it!

Some apps will have just a single entry on the Magisk Hide list while others could have multiple, such as Pokémon GO. Tapping the down arrow icon will expand the rest of the entries for that specific app. It should enable them all by default when you tap the first dot, but it's always good to make sure everything is checked off when going through the list of offending apps anyway.

Step 3Enjoy Your Apps & Games

From here, you can dive right into the apps and games that you thought you'd never be able to use as a root user. You don't have to worry about doing a reboot when using Magisk Hide, but occasionally you might try that if an app is still not playing nice with root access.

The apps and games listed below are just a few good examples you might find yourself using now that you can completely avoid root detection. There are plenty more examples out there that try to block root users, but with the power of Magisk at your disposal, you should have little to no issues whatsoever. There's always a chance for new root detection methods, but everything is good right now.

Pokémon GO

Harry Potter: Wizards Unite

PS4 Remote Play

Spectrum TV

Credit One Bank

Pass Safetynet on Rooted Device


DISCLAIMER ⚠️

We don't know if this method works or not on every device but you can try this method AT YOUR OWN RISK! You May need to Format Data or Clean Flash your ROM if this method didn't work for you! Make Sure to Take A Backup BEFORE FLASHING THIS, We are NOT Responsible for any Damages whatsoever! 


Requirements

-- Latest Stable Magisk should be installed.

-- Download the toolkit 


Instructions

 -- Extract the toolkit using any File Explorer. 

-- You will find 3 files - Riru core, Lsposed module & XPrivacyLua apk. 

-- Open Magisk and Flash Riru Core, But do not reboot.

 -- Go back and flash Lsposed in magisk & reboot your device. 

 -- Now install XPrivacyLua apk

 -- Open Lsposed and go to modules section and choose XPrivacyLua from there.

 -- Select system framework, Settings storage and Google Play services there.(Uncheck the system apps from hide section settings for Play services to show up)

-- Reboot your device

 -- Open XPrivacyLua and search google play services, click drop down menu in left of play services and tick 'use tracking' as shown in the screenshot.

-- Tick 'use tracking' on banking apps too and clear data of them after ticking

-- Now clear play services and play store data through your phone's settings. 

-- Hide magisk and change name of magisk

-- Your Safetynet Should Pass Now!


FAQ's regarding this guide


-- Our users reported us in the discussion group that it's working perfectly after checking use tracking option in Play Services!

=> Errors with Banking Apps even after CTS and Safetynet Passing 

-- Clear data of Google Pay or whatever Banking app you're using 

-- Make sure you've renamed Magisk and Magisk hide option has been enabled

-- Hide Your Banking apps in Magisk hide and XPrivacyLua (just tick use tracking option only)


Thanks to @saitama_96 for the idea and fix and thanks to people in #TeamFiles Chat who tested this fix!


If you have any Queries/Issues you can contact us in Our Discussion Group!


Stay Safe,

TeamFiles


Monday, August 9, 2021

Xaiomi Redmi Note 9t - Individual apps for Dark Mode not showing up.


It's only showing some apps, not all that I have installed. I'm trying to disable dark mode for messenger, but it just doesn't show up in the list. Is there a fix for this issue. 


Found the fix. Set Dark mode first and then Search for "Dark mode" in settings. Now select the "More dark mode options" and all the apps will be shown which have dark mode enabled and turn off them.


Via https://old.reddit.com/r/Xiaomi/comments/kryn5c/individual_apps_for_dark_mode_not_showing_up/


Wednesday, August 4, 2021

ROOTING + CUSTOM ROM, YOUR BRAND NEW REDMI NOTE 9 T FOR THE NOOB

 ## first version , errors may still occur

Hi everybody, as a noob in the rooting world , here is my small contribution. A step by step how-to , to completely root + installing a custom.
DO NOT HESITATE TO COMMENT SO I CAN IMPROVE THE DOC:
=======================================================================

Read the complete procedure carefully before start: Beware you will loose all data you may have on the phone .and you will loose warranty .

## REQUIREMENTS :​

a brand new redmi note 9T (direct from the store, no modifications), a pc with windows , the usb cable to link the pc to the phone.
A sdcard where you can store the rom and some zip to put in your phone

Make sure the pc is up ot date with latest android usb driver and adb available :
usb drivers here : https://developer.android.com/studio/run/win-usb
adb software : https://www.xda-developers.com/install-adb-windows-macos-linux/
we also need 7zip https://www.7-zip.org/

Also try to update your phone with the latest MIUI version you can get (at the the time I'm writing this it should be MIUI 12.5, based on android 11).

To upgrade go to system/about phone/ tap on the MIUI logo/ check for update .

If your phone is still stuck to a lower version, you may trick it by changing the region (I choose hong kong) in system/additional settings/region
then try to check for MIUI update again.


## FIRST STEP : unlock the booloader .​

for this you need a xiaomi account (if you created one with your phone , use it)
You also need to enable developper mode in your phone , so you can access usb debuging . (see the video tutorial)
a video tutoriel here :

you will probably have to wait 168 hours before you can unlock the phone (Yes you're not alone to think it's annoying, do not hesitate to complain to xiaomi business department)


there is also this version of the unlocker (to bypass the wait time), but I have not tested it
Moreover the bypass works for devices not yet linked to mi account

Once your bootloader unlock you phone will be reseted and when you restart it you will be asked for the xiaomi account password again (and you need a network connection).
After completing the setup again, don't forget to reactivate usb debuging option .

### SECOND STEP download and save files


In case your want to rollback, and also if your want to install magisk in some custom rom , you need to download the original MIUI rom here :

from the zip file , you need to extract the boot.img file and transfer the file on your phone

then the install on your phone the magisk apk file : https://magiskapp.com/#magisk-app-apk
run the magisk app , choose install magisk , select patch a file and choose the boot.img file then press the let's go button
Magisk will generate a patched_image_file in your download folder .
copy the patched image file to your sdcard.

on your phone you can install this : https://play.google.com/store/apps/details?id=tk.hack5.treblecheck

It will help you select the type of rom you need to download

Plug your phone to the computer , open a command shell in your adb fastboot directory and type :
adb devices

you should see something like :

List of devices attached
sceqxxxxxxxxxxk device


(if not check your phone screen ,if there is some grant access dialog)

download orangefox from here https://github.com/gsuzeda/twrp_cannon/releases/

put the vbmeta.zip and OrangeFox-R11.0-Unofficial-cannong.zip on the sdcard

put the recovery.img in the same directory than your adb fastboot program

download the latest magisk files release from here :
first the zip : https://magiskapp.com/zip/#download-now
and the apk file : https://magiskapp.com/#magisk-app-apk
and put them on the sdcard


download the latest of the custom rom you want to install. Based on this link (thank you @gsuzedahttps://docs.google.com/spreadsheets/d/1Nm1RAQ_kiSoSBgtzux8uKklLF9TF6-1QvIVCPzW3OCs/edit#gid=0

, I will try AOSP rom here : https://github.com/phhusson/treble_experimentations/releases/latest
but you can also try lineageOS here : https://sourceforge.net/projects/andyyan-gsi/files/
(if you choose AOSP , you can not install magisk , at least for now)
NOTE: If your choose another custom rom , remember you may also need to install google apps as a separate package .
Example for lineageOS , you can download the gapps (MindtheGapps for arm64 )here https://androidfilehost.com/?fid=2188818919693781601
and copy the file to your sdcard

The redmi note 9T code name is CANNONG . It uses ARM64 A/B IMAGES and we want vndklite (read/write on system)

This is important whatever the custom rom you choose to download and install

Now we prepare the image files from the custom ROM so we can choose between two install methods

METHOD ONE is flashing the system.img from the computer with the phone in fastboot mode plugged to the pc.

METHOD TWO is flashing a zip file with the phone in recovery mode (using the orangefox program or twrp)
I choose his method , because you can do all the operation from orangefox recovery
for method two we will use https://forum.xda-developers.com/attachments/gsi_flasher_sdcard-zip.5183639/
(thank you @gsuzeda for the complete method here https://forum.xda-developers.com/t/...ung-galaxy-a51-super-partition-image.4216083/ )

unzip the gsi flasher somewhere on your PC (for me Mydocument\gsiflasher)

exemple usage with AOSP rom:

uncompress the system-roar-arm64-ab-vndklite-gapps.img.xz
copy the img file in the gsi directory of the gsi flasher and rename it system.img (so for me cp system-roar-arm64-ab-vndklite-gapps.img to Mydocument\gsiflasher\gsi\system.img).
then create a zip file with the 3 directories (gsi, META-INF, scripts) in Mydocument\gsiflasher using 7 zip , for example system-roar-arm64-ab-vndklite-gapps.zip.
And finally copy this zip to the root of your sdcard .

## THIRD STEP : install orangefox​

orangefox is a recovery program like twrp but with more option.

Check if you booloader is unlock in your phone by going to system\additonal settings\developper option\mi unlock status

If the booloader is unlock then you can install recovery orangefox .

Make sure than usb debugging and install via usb is checked in the developper option of your phone
power off your phone and restart your phone in fastboot mode (volume down + power )
plug it to your pc .
open a command shell in the directory were fastboot is installed
write the command :
fastboot devices

it should give you a list with your device
then write the command
fastboot flash recovery recovery.img

once the install complete reboot your phone in recovery mode with the command :
fastboot reboot recovery

once boot in recovery mode you should see the orangefox menu.

orangefox-recovery_557748_full.jpeg


Use the "Files" at the bottom at the screen explore to go to the sdcard and tap on the orangefox zip files .

then swipe to install

Once the file installed , the phone should reboot in recovery.

Then use the file explorer to find the vbmeta.zip
ttap the file and swipe to install

after the install the phone should reboot.
a simple check step to see if everything went right

## FOURTH STEP , test and install custom OS​

There is two method to install , via recovery or via fastboot

I choose to use orangefox recovery

via recovery
reboot in recovery mode (volume up +power)
Once booted in orangefox recovery

first format the DATA (using the wipe menu,and you need to type yes to confirm )
Then reboot to recovery (from the orangefox menu choose reboot then recovery)
once rebooted in recovery
wipe data cache and dalvik

then with the file menu of orangefox navigate to the root of your sdcard where you stored the system zip we created for example system-roar-arm64-ab-vndklite-gapps.zip.

tap the zip and swipe to install
(if your choose another rom , do the same thing to also intall the gapps zip file)

once the install complete
wipe data cache and dalvik
reboot the phone .

## FIFTH STEP check install​

your phone should now start with AOSP version of android and start the setup program.

If you get a message like your device is not play protect certified :

connect your phone to your computer, in a command shell type :

adb root
adb shell
sqlite3 /data/data/com.google.android.gsf/databases/gservices.db
select * from main where name = "android_id";


then copy the id number printed and go there :

and enter the id in the text box and press register

wait 15 minutes and reboot your phone and finish the setup process and connect to google store with your gmail account
If your installation complain about the sd card, choose format as external. (you may have to transfer the files of step one in the card again)

## SIXTH STEP : install magisk​

(DOES NOT WORK WITH AOSP ROM)

reboot in recovery.
in the orangefox file menu :
search your magisk.zip file on the sdcard , tap and swipe to install.
Then choose the patched_boot_img file and choose /boot to install
Then choose the vbmeta.zip and install
wipe cache and reboot
All you want to know about magisk is here : https://magiskapp.com/

### LAST STEP , secure back​

now disable usb debugging
unchecked the option : install app from unknow sources

### ROLLBACK​

In case you want to rollback to MIUI rom
go there : https://www.getdroidtips.com/guide-flash-miui-rom-xiaomi-devices/
and follow the chapter : the How to Flash Xiaomi Firmware via TWRP Recovery