Pages

Friday, February 28, 2014

How to add hyperlink between slides within PowerPoint

Method 1: Add hyperlink on text.
Method 2: Add invisible hyperlink between slides.
Method 1: Add hyperlink on text.
Step 1: Right click on the selected text and choose Hyperlink.
add-hyperlink-between-slides-1


Step 2: The Insert Hyperlink window will pop up. Usually we will fill URL in the Address column here.
add-hyperlink-between-slides-2


Step 3: For adding hyperlink between slides, you need to choose Place in This Document at the left and then select the destination slide.
add-hyperlink-between-slides-3


By using invisible hyperlink, you can not only add hyperlink on text, but also on image or even put the hyperlink on any place of a slide.

Step 1: Add an Action Button. In the Insert tab, Illustrations section, find the Shapes. Choose the Action Button: Custom, the last one of the Action Buttons.
add-hyperlink-between-slides-4


Step 2: Add hyperlink on the Action Button. Right click on the button and choose Hyperlink, and the Action Settingswindow will show up. In the Hyperlink to: section, choose Slide…
add-hyperlink-between-slides-5
Select the slide that you want to hyperlink to.
add-hyperlink-between-slides-6


Step 3: Make the Action Button invisible. Right click on the Action Button and choose Format Shape and then choose No fill in both Fill and Line Color sections so that you will not see the button any more.
add-hyperlink-between-slides-7


Tips: Remember the location where you put the invisible Action Buttons.

Add Anchor Tags To Jump To Specific Location On A Page

By including an anchor tag within a post or page, you can place links in the body of your post which when clicked allow the reader to jump to another location on the page.
The anchor tag will consist of two HTML elements. First, you'll want to create the link.
If you are linking to a spot on the same page, the format of the link will be similar to:
<a href="#anchor">Link Text</a>

For example, if the text is "Read more about raptors!" then your HTML should look like this:
<a href="#raptors">Read more about raptors!</a>
The above anchor link only works when you are jumping to a specified spot on the same webpage. If you want a link to jump a specific location on a different page, you'll need to replace #anchor with the full URL for the page, similar to:
<a href="http://example.typepad.com/blog/2012/05/filename.html#anchor">Link Text</a>

When composing your post or page, click the HTML tab in the toolbar and enter the link code.

The second part of an anchor tag is the actual anchor. The anchor should be placed at the beginning of the line where you want to start reading after you jump similar to:
<a name="anchor"></a>

Following our previous example, the anchor code will be:
<a name="raptors"></a>
When composing your post or page, click the HTML tab in the toolbar and enter the anchor code at the beginning of the line where you want to jump.
If you want to have the link use an image, switch out the text in the link with the code for an embedded image, like this:
<a href="#raptors"><img src="http://example.typepad.com/raptors.gif" /></a>
- See more at: http://help.typepad.com/anchor-tags.html#sthash.VKkrEabi.dpuf

Upgrading Dell Latitude D630 RAM

Scroll Down
While many notebooks will allow you to install or exchange both memory modules at the same physical location, you will have to access two different spots to upgrade the SO-DIMMs of the Latitude D630. The first DIMM can be found on the bottom of the notebook after removing a little cover. The second DIMM socket is located on the top of the device, below the keyboard and right next to the mouse keys.

  ram scaling notebooks

 The DIMM socket for RAM channel A is located at the bottom of the notebook motherboard, and so is accessed through a little opening. Removing the small metal cover is sufficient to install or exchange a memory module.
  ram scaling notebooks
The second DIMM socket, for RAM channel B, can be found right next to the touchpad buttons. You’ll have to remove the keyboard to access it.

Stupid way you have to highlight text in Powerpoint

Highlight text

Microsoft Office PowerPoint does not include the text effects for highlighting on the Format menu that come with Microsoft Office Word. You can reproduce these effects by using the Drawing toolbar, however.
  1. Display the slide with the text you want to show as highlighted.
  2. From the Drawing toolbar in the lower-left corner of the screen, choose the Rectangle tool.
  3. Draw a rectangle over the text you want to highlight.
  4. Double-click the rectangle, and, in the Format Autoshape dialog box, do the following:
    • Choose the highlight color you want from the Fill color list.
    • Choose 50% in the Transparency box.
    • In the Line Color box, choose No Line.

Friday, February 21, 2014

Show Folder Tree in Windows 7 Explorer

I spend a lot of my time switching between folders in Windows explorer and the Windows 7 explorer has been driving me nuts lately.
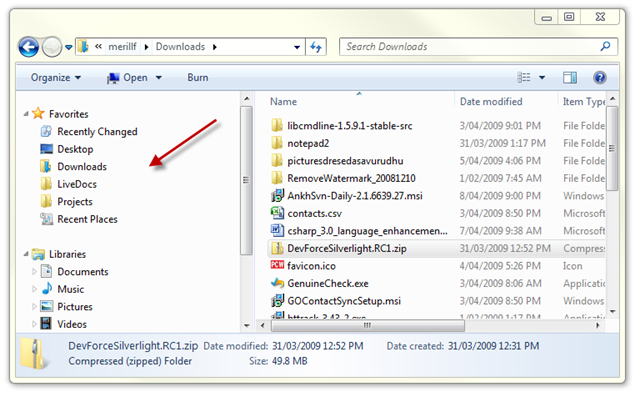
Win7 (or at least the build I have) by default does not auto expand the tree view when you navigate between folders.
The result being you don’t see the usually tree hierarchy on the left pane. Which makes it quite painful if you want to go up a few levels or see the other parent folders.Windows7-Explorer
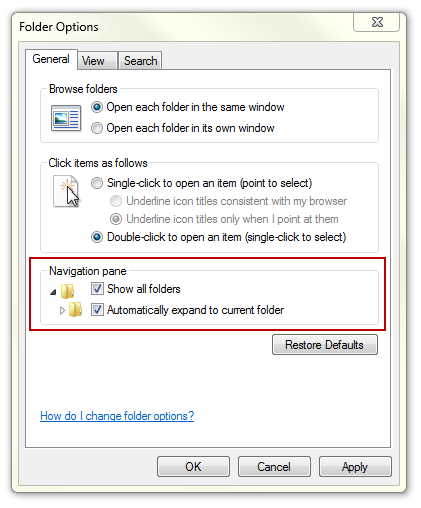
Luckily there is a new Folder Option called Navigation Pane to switch them back on again. You need to press Alt + T or Organize –> Folder Search Options in Windows Explorer to get to the dialog. Windows7-FolderOptions
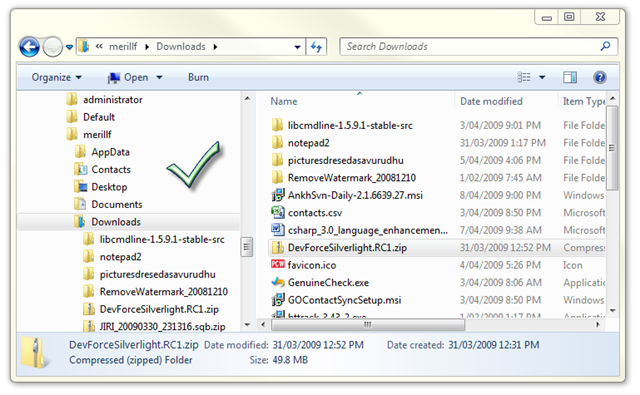
Switch both of them on and viola I get my beloved tree view back.
Windows7-Explorer-Expanded

Tuesday, February 18, 2014

How to bypass T-Mobile’s anti-tethering policy

T-Mobile instituted a hotspot plan in 2010, but many users were never charged because of technical limitations with the software. Recently T-Mo has been blocking users, after receiving Ice Cream Sandwich upgrades, and redirecting them to a sales page telling them that they can purchase the feature for an additional $14.95 per month. If you’re a T-Mobile user and experiencing this, you can bypass it, and it’s not too difficult.
First of all this is what’s happening now:
Their filtering is based on HTTP user-agents. If your user-agent matches a known user-agent that is not android it
will reject the traffic. Now there are two problems with this,
A.) If an unknown userAgent is passed or No user agent, your traffic is accepted.
B.) There are a bazillion TCP protocols that do not have user-agents.
So off the bat with no user-agent spoofing, all protocols work except HTTP, including HTTPS, HTTPS works out of
box because of its encryption.
So how do you get around this? All you have to do is change your user agent profile. If you’re using Chrome, you can download this add on or this one for Firefox users. These will allow you to spoof your user-agent profile. If you’re using another Browser, just search for an appropriate plugin. After you’ve installed the plugin, just change your user-agent to Android XOOM for example and enjoy free tethering.

Tether T-mobile prepaid plan

I have the T-mobile $30 unlimited prepaid plan and I ran into the tethering block after getting my Nexus 5.

I was able to work around the issue by modifying the following sqlite database (you'll need root):
/data/data/com.android.providers.settings/databases/settings.db

You need to add a new entry to the global table called "tether_dun_required" with a value of 0.

It looks like you need to do this because some configuration data was added to Android for T-mobile that forwards tethered data to this APN: pcweb.tmobile.com
T-mobile is probably checking to see if your account has tethering enabled when you go through this APN.

After I made this change I also needed to change my APN settings so that it uses ipv4 instead of ipv6. It seems like tethering with ipv6 does not work 100% yet.

I hope this helps.

Saturday, February 15, 2014

Borderless Fullscreen Window Skip Valve Video Enable Console DOTA2: Defense of the Ancients 2

I wanted to browse the internet while DOTA2 was searching for a server. I found out that since the game is made in the source engine that you can do the same launch options as any other source game, Like TF2.

Enter this into launch options under prefrences of DOTA2.
-windowed -fullscreen -noborder -novid -console

 This makes the game a borderless fullscreen window that you can just scroll your mouse off to the side and interact with other windows. It also enables the developer console button ~ and allows you to input quick commands like quit

Here is an image of where to input the options.

How to use Thunderbird with a Cardmail Account / Office365 email account

General instructions for other POP or IMAP email programs

If the program you're using isn't listed above, use the following information to help you set up your email.
  • Email address: This is your full email address (for example, tony@contoso.com).
  • User name: Your user name is your full email address (for example, tony@contoso.com).
  • Password: This is the password for your email account.
  • Incoming mail server settings: These are your incoming (POP3 or IMAP4) server settings.
    • If you’re connecting to your Office 365 email, use the following settings.

SERVER NAMEPORTENCRYPTION METHOD
POP3outlook.office365.com995SSL
IMAP4outlook.office365.com993SSL

How to delete a mail account in Thunderbird

Go to Edit->Properties and select the Account. Then Click on Account Action at the left bottom of the current Window and delete your Account.

How To Disable Restart Your Computer To Finish Installing Important Updates Prompt

We have all been there and seen it. Whenever updates are installed in Windows that require a reboot, you are prompted in regular intervals to do so. These messages appear shortly after installing the updates, and then regularly until you do so. The Restart Your Computer To Finish Installing Important Updates prompt offers to postpone the update for 10 minutes, 1 hour or 4 hours. The prompt is then displayed again if the computer has not been rebooted in the meantime.

Many Windows users dislike the nagging prompt, especially if they are currently running tasks that would be interrupted by a reboot. This includes video rendering, an important download or upload, or a document that needs to be finished in the next hour or so.
restart your computer to finish installing important updates
While you could select 4 hours from the menu to see the reboot prompt after 4 hours, you may still like to disable the display of the update prompt for a longer period of time. This can be useful if you are currently in a day long presentation that requires the computer.
There are two options to deal with the issue. You could first stop the Windows Update service for the current session. This basically blocks the prompt and any attempt to install new updates until the computer is rebooted.
The following steps are needed for this:
  • Open up an elevated command prompt window. You can do that by clicking on the Start button of the operating system, entering cmd in the search form and using the shortcut Ctrl-Shift-Enter to open it with administrative privileges. A user account control prompt may be displayed.
  • Run the command net stop "windows update" to stop the Windows Update service for the current session.
net stop windows update
You can restart the service with the command net start "windows update". The service will also be started normally on the next start of the system.
The second option lets you disable the auto reboot option when users are logged on. This requires some Registry hacking and is only suggested for advanced users. You may also want to backup the Registry first before you make those changes.
  • Use Windows-r to bring up the run box. Enter regedit and hit enter to open the Windows Registry Editor.
  • Navigate to the following Registry key HKEY_LOCAL_MACHINE\SOFTWARE\Microsoft\Windows\CurrentVersion\WindowsUpdate\Auto Update
  • Locate the ForcedReboot key there and change its value from whatever it is set to to 0.
Please note that this works only under Vista, Windows 7 and newer operating systems.
The third and final option is the Local Group Policy Editor which is only available in some versions of the Windows operating system. Go to Computer Configuration > Administrative Templates > Windows Components > Windows Update and locate the following two parameters:
  • No auto-restart for scheduled Automatic Updates installations
  • Re-prompt for restart with scheduled installations
Enable the first parameter to block automatic restarts after update installations, and set the second to a high enough period to receive the reboot prompt less often.

local group policy

Friday, February 14, 2014

Internet Download Manager IDM Chrome Browser Integration


How to install the "IDM Integration" extension from Chrome if the Installer does not work correctly.
You need to open IDM installation folder ("C:\Program Files\Internet Download Manager" by default, arrow 1 on the image), then rename "IDMGCExt.crx" to "IDMGCExt.zip". (arrow 1 on the imageextract the zip into a folder such as /idm plugin/  (arrow 2 on the image). Then go to chrome's Extensions options by going to select "Settings" menu item. Then select"Extensions" tab and click on Load unpacked extension (arrow 3 on the image) and select the folder /idm plugin/. It should add the plugin to installed extensions.


2. How to configure IDM extension for Chrome?
You need to press on Chrome menu (arrow 1 on the image), and select "Settings" menu item (arrow 2 on the image). Then select"Extensions" tab (arrow 3 on the image).


Check that "IDM Integration Module" extension is enabled (arrow 4 on the image). If you use incognito mode in Chrome, you need to enable "Allow in incognito" checkbox (arrow 5 on the image).

Changing screen resolution from command line in Ubuntu and Debian VM

So I needed to change the default resolution on a Debian VM that I was working on, and I couldn't find the place to change the monitor resolution size settings. I found an easy terminal command as the fix.

Run these in command line terminal :

xrandr 
this will display available resolutions. Then you can perform the following:
 

xrandr -s 1024x768 This would change the screen resolution to 1024x768 (provided your monitor supports 1024x768)