Monday, July 26, 2021
Adguard ad blocker for non rooted android phones
Thursday, July 22, 2021
Latest MI Unlock can't detect device - MI Unlock Tool cannot detect phone - Mi unlock tool not detecting the device [FIXED]
Oh THANK GOD, I finally went past this step. Thank heavens jeez. So here's my short guide that tells what I did to resolve this problem.
Note: I have Mi Unlock tool version 2.3.803.10 (latest as of now). I'm on Windows 10 x64 build 15063.
1. Extract the zipped archive of MI Unlock tool to the root of your system drive, like C:\any_folder. I extracted it to C:\unlock, so the path of the tool's executable became "C:\unlock\miflash_unlock.exe"
2. Run MiUsbDriver.exe from the folder with as administrator and click "Install". Make sure it says "Driver installed" after that. If it already says that, hit install again just to make sure. Click "Retesting" to see if it remains the same. Close the program after.
3. Put your device into fastboot mode (make sure to turn on USB debugging and OEM unlocking in the developer options), and connect it through USB 2.0 port. (I don't know if 2.0/3.0 makes a difference but if you have 2.0 available, use it).
4. Go to device manager. Expand "Android Phone", right click "Android Bootloader Interface" and click properties. Click on "Driver" tab. See if the driver provider is "Xiaomi Technology, Inc.", driver date is "11/3/2016", and driver version is "16.0.0.0".
IF it's not, then close the properties window, right click android bootloader interface and click "Update driver". Click "Browse my computer for driver..." then "Let me pick from a list ...". Uncheck "Show compatible hardware", click "Xiaomi Technology, Inc." from the left side, then "Android Bootloader Interface" from the right and click next. After it's installed, check the properties to make sure it says what I mentioned above.
5. Go to unlock tool folder. Go to driver\win10 folder, right click android_winusb.inf and click install. You'll get operation completed successfully message.
6. Go back to unlock folder and run the tool as administrator. Now before clicking agree, click on the settings gear on the top right corner. Make sure MI Usb Driver says "Already installed". This is really important. Otherwise IT WON'T WORK. If it doesn't say that check previous steps and make sure your didn't miss any. Beyond that I have no idea.
7. Now you're good to go. Click agree, sign in and voila, your phone shall be connected, ready to unlock
via https://forum.xda-developers.com/t/resolved-mi-unlock-tool-cannot-detect-phone.3663139/
Friday, July 9, 2021
How to download high-quality music from Deezer - Getting your own ARL
If you don’t know what Deezer is, it is a french music streaming service just like Spotify and Tidal. It is free to use with ads and a lower sound quality. Because Deezer also offer a more expensice “Deezer HiFi” subscription they also store music in lossless FLAC files.
The good thing is that these files can be downloaded very easy and very fast in DRM free FLAC with just the free subscription. This can be done in many ways, but here I will explain maybe the easiest way.
Get token from cookie
Use Google Chrome and go to Deezer.com and log in to your Deezer account (Create a free account if you don’t have one already).
When logged in click F12 to open up Google Chrome’s developer settings.
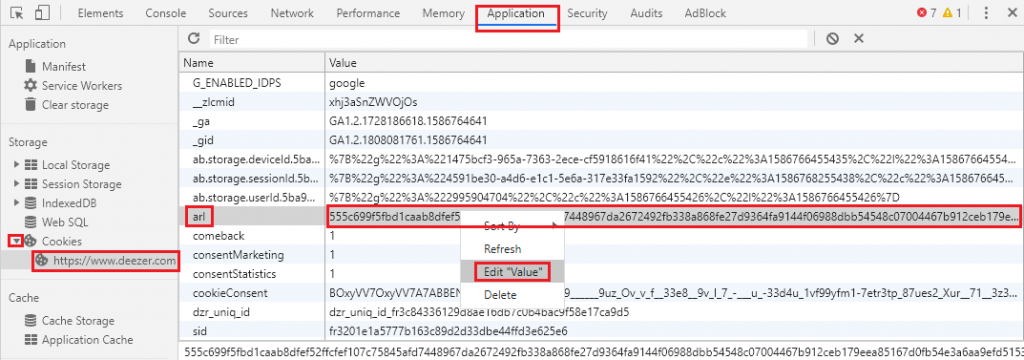
Go to Application in the top-menu and expand Coockies in the left menu. Then click on https://www.doozer.com.
Find arl and copy it’s value. This can be done by marking it and right click, then Edit Value. Copy the value.

Example on token:555c699f5fbd1caab8dfef52ffcfef107c75845afd7448967da2672492fb338a868fe27d9364fa9144f06988dbb54548c07004467b912ceb179eea85167d0fb54e3a6aa9efd51535b5d7619c790461c35210c16cdd2d09b29cf29bc0953086a4
Application (Windows)
go to https://deezloader.site/download/ and download the Windows version.
Install and run the program.
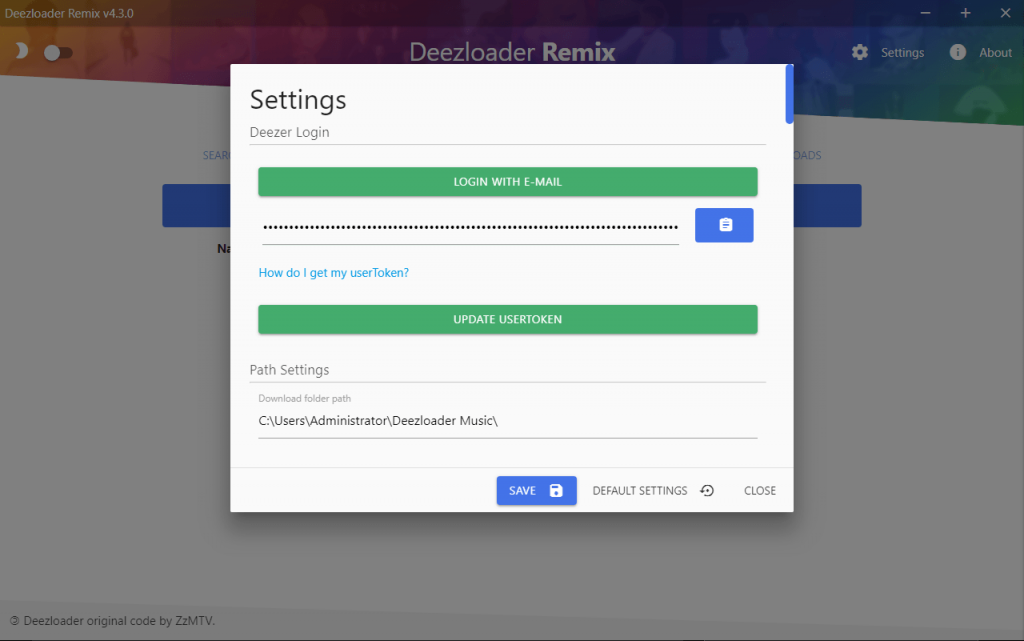
Go to Settings and paste your token in the userToken field and click UPDATE USERTOKEN.
The message You are logged in as … will show. Click SAVE.

If you now go back to Settings there is a lot of settings available to customize download location and formatting.
I recommend to change Preferred bitrate from MP3 320kbps to FLAC 1411kbps if you want the best possible sound quality.
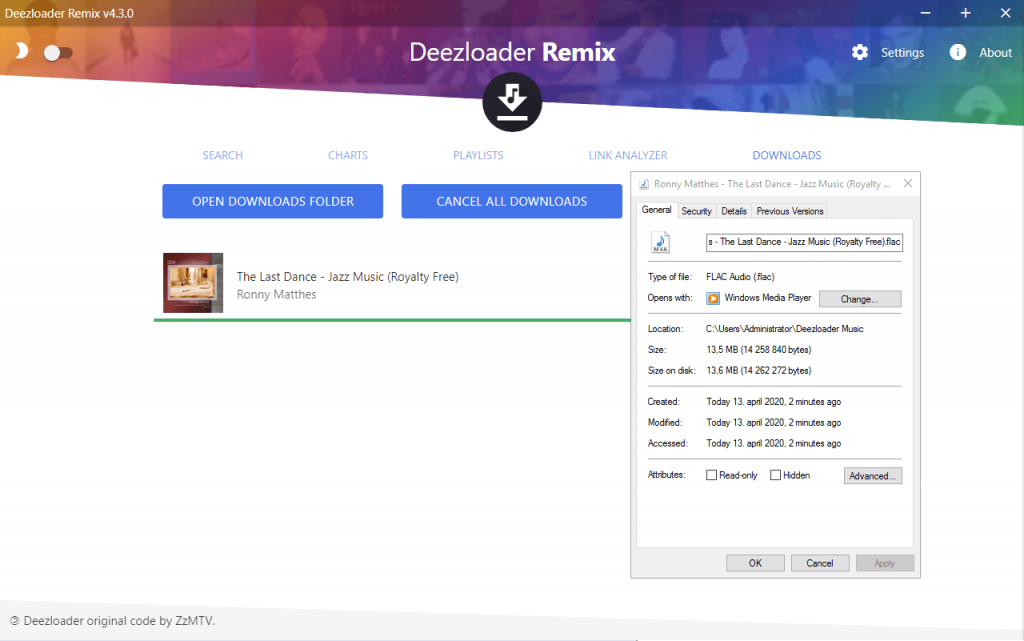
Now you can search throughout the library and download whatever you want. Enjoy!

Deezer keeps track of login session by using a cookie called ARL.
deemix uses that cookie to get the metadata that it needs to download the tracks from Deezer.
ARLs last for 3 months, after that Deezer asks you to log in again. The same method is used in deemix
Following one of the guides below you can get your own account ARL.
- Open Chrome
- Go to www.deezer.com and log into your account
- Click on the little “lock” icon next the URL
- Click on Cookies > deezer.com > cookies > arl
- Select the string next to Content, and Copy
- That’s your ARL, now you can use it in the app
- Open Chrome
- Go to www.deezer.com and log into your account
- After logging in press F12 to open up Developer Tools
- Go under the Application tab (if you don’t see it click the double arrow)
- Open the cookie dropdown
- Select www.deezer.com
- Find the
arlcookie (It should be 192 chars long) - That’s your ARL, now you can use it in the app
Here’s a video guide
- Open Firefox
- Go to www.deezer.com and log into your account
- Afer logging in press F12 to open up Developer Tools
- Go under the Storage tab (if you don’t see it click the double arrow)
- Open the cookie dropdown
- Select www.deezer.com
- Find the
arlcookie (It should be 192 chars long) - Make sure only copy the value and not the entire cookie
- That’s your ARL, now you can use it in the app
- Install firefox (if you don’t have it)
- If you have the android Deezer app, its better to uninstall it, so it doesn’t launch after login
- Get some extension to change your useragent (UserAgent Switcher)
- Get the extension “Cookie Manager”
- Change your useragent to some browser on pc (eg. Chrome on Windows 10)
- Login to deezer.com
- You need to see the home page of deezer. If you don’t see it you did something wrong.
- Go on cookie manager and search for “arl”
- Copy the value
- That’s your ARL, now you can use it in the app
IF AFTER LOGGING IN YOU CAN’T FIND THE ARL COOKIE OR YOU GET SENT TO THE PLAYSTORE THEN YOUR USERAGENT CHANGER DIDN’T WORK
Thanks to uh hey for the Android method
via https://flemmingss.com/how-to-download-high-quality-music-from-deezer/ and https://codeberg.org/RemixDev/deemix/wiki/Getting-your-own-ARL
Saturday, June 5, 2021
Tuesday, March 16, 2021
Fix Windows update errors - How to fix Windows update for Windows 7
- Download the appropriate (x64 or x86) versions of these three updates: KB3020369, KB3172605, and KB3125574.
- Disconnect from computer from the internet to stop the following steps from searching online for updates
- Open an elevated PowerShell prompt and run the following commands, which will allow the next updates to install quickly:
- stop-service wuauserv
- remove-item c:\windows\softwaredistribution\WuRedir
- Double-click and run the KB3020369 update (previously downloaded). Should take less than 2 minutes to run, and will not require a reboot.
- Now double-click the KB3172605 update you previously downloaded. Follow the prompts. Reboot when it says to. (This step should take about 1 minute).
- Double-click and run the KB3125574 update (previously downloaded). Should take about 12 minutes to run. It will require a reboot that takes 5 minutes to complete.
- Begin WU (Windows Update) after completing the above steps. A list of 60+ available updates should be returned within 5 minutes.
- Finish updating normally ... rebooting when it says to. You will probably need to reboot and re-check for updates at least two more times.
How to turn multiple PSX .BIN files into one using CDMAGE
If you're like me and want to emulate some good old PSX games and happen to stumble upon some roms that have multiple .BIN tracks here is a guide to turn them into a single .BIN file that will load with retroarch.
Step 1: Unzip your Rom like so:
Step 2: Download CDMAGE
https://www.emuparadise.me/links-and-downloads/General_CD_Utils/CDmage_1.02.1_Beta_5/20
Step 3: Open Cue file in CDMAGE
Tuesday, March 9, 2021
Full Speed PSX finally here on New 3DS / New 2DS XL (Metal Gear Solid, Crash Bandicoot, Final Fantasy IX, Vagrant Story, Resident Evil 2, etc.) RetroArch – Convert PlayStation 1 BIN/CUE to CHD
There was a lot of attention in 2019 when the UNAI renderer was added to PCSX Rearmed, as it meaningfully improved the ability of 3DS owners to play PSX classics.
Unfortunately, as anyone who tried it out could attest, the performance was still extremely spotty. 2D games generally performed better but overall playability varied significantly from title to title.
Over the past six months, the situation has improved dramatically. Incredibly, there has been very little attention despite the huge improvements. The latest nightlies now run most PSX games at full speed, including demanding titles like Metal Gear Solid!
To get started, you will need to download a recent nightly of the PCSX Rearmed Retroarch core. Then you will need to enable the following settings.
- Compress your game to either CHD or PBP. CHD is the superior solution.
To do this conversion you need chdman.exe which can be found inside the MAME Official Windows Binary packages located here – mame0201b_64bit.exe was the latest release when I did the conversion.
Extract chdman.exe from mame0201b_64bit.exe into the same folder as your PSX BIN/CUE files. Then you can just run one command to convert everything to CHD:
1 | for %i in (*.cue) do chdman createcd -i "%i" -o "%~ni.chd" |
- Switch Audio Driver to DSP_Thread. This step is very important. Threaded audio was only added in the past few months and provides a meaningful performance boost. You will need to restart Retroarch to realize this setting change.
- Enable Audio Synchronization.
- Disable Video Synchronization (unless you are playing a 2D game). You will not notice a negative difference in 3D games.
- In Quick Menu -> Options, set CD Access Method to Async. You will need to restart Retroarch to realize this setting change.
- In Quick Menu -> Options, set Threaded Rendering to Async. This is extremely important. Threaded Rendering option was only added in the past few weeks.
- In Quick Menu -> Options, enable Advance GPU UNAI/PCSX4All Settings.
- In Quick Menu -> Options, Enable High-Res Downscaling. This option will only show up once you show Advanced GPU UNAI/PCSX4All Settings and then close and reopen the Quick Menu. M
For good measure you may want to Restart Retroarch after making the last changes.
via https://blog.thirdechelon.org/2018/10/retroarch-convert-playstation-1-bin-cue-to-chd/