Pages

Showing posts with label Linux. Show all posts

Thursday, June 19, 2014

Linux: Howto Make a Directory Command

How do I make directory under Linux operating systems using the command prompt or bash shell?

You need to use the mkdir command to create new folders or directories under Linux operating systems. A directory (also known as folder in MS-Windows/OS X) is nothing but a container for other directories and files.

mkdir command Syntax

The mkdir command has the following syntax:
mkdir dirname
OR
mkdir dirname1 dirname2
OR
mkdir [option] dieNameHere
OR
mkdir -p dir1/dir2/dir3

Examples

Open a terminal and use the mkdir command to create empty directories. The following command would create a directory called foo:
$ mkdir foo
To list directories, enter:
$ ls
$ ls -l

The following command would create two directories within the current directory:
$ mkdir tom jerry
$ ls -l

The -p option allows you to create parent directories as needed (if parent do not already exits). For example, you can create the following directory structure:
$ mkdir -p ~/public_html/images/trip

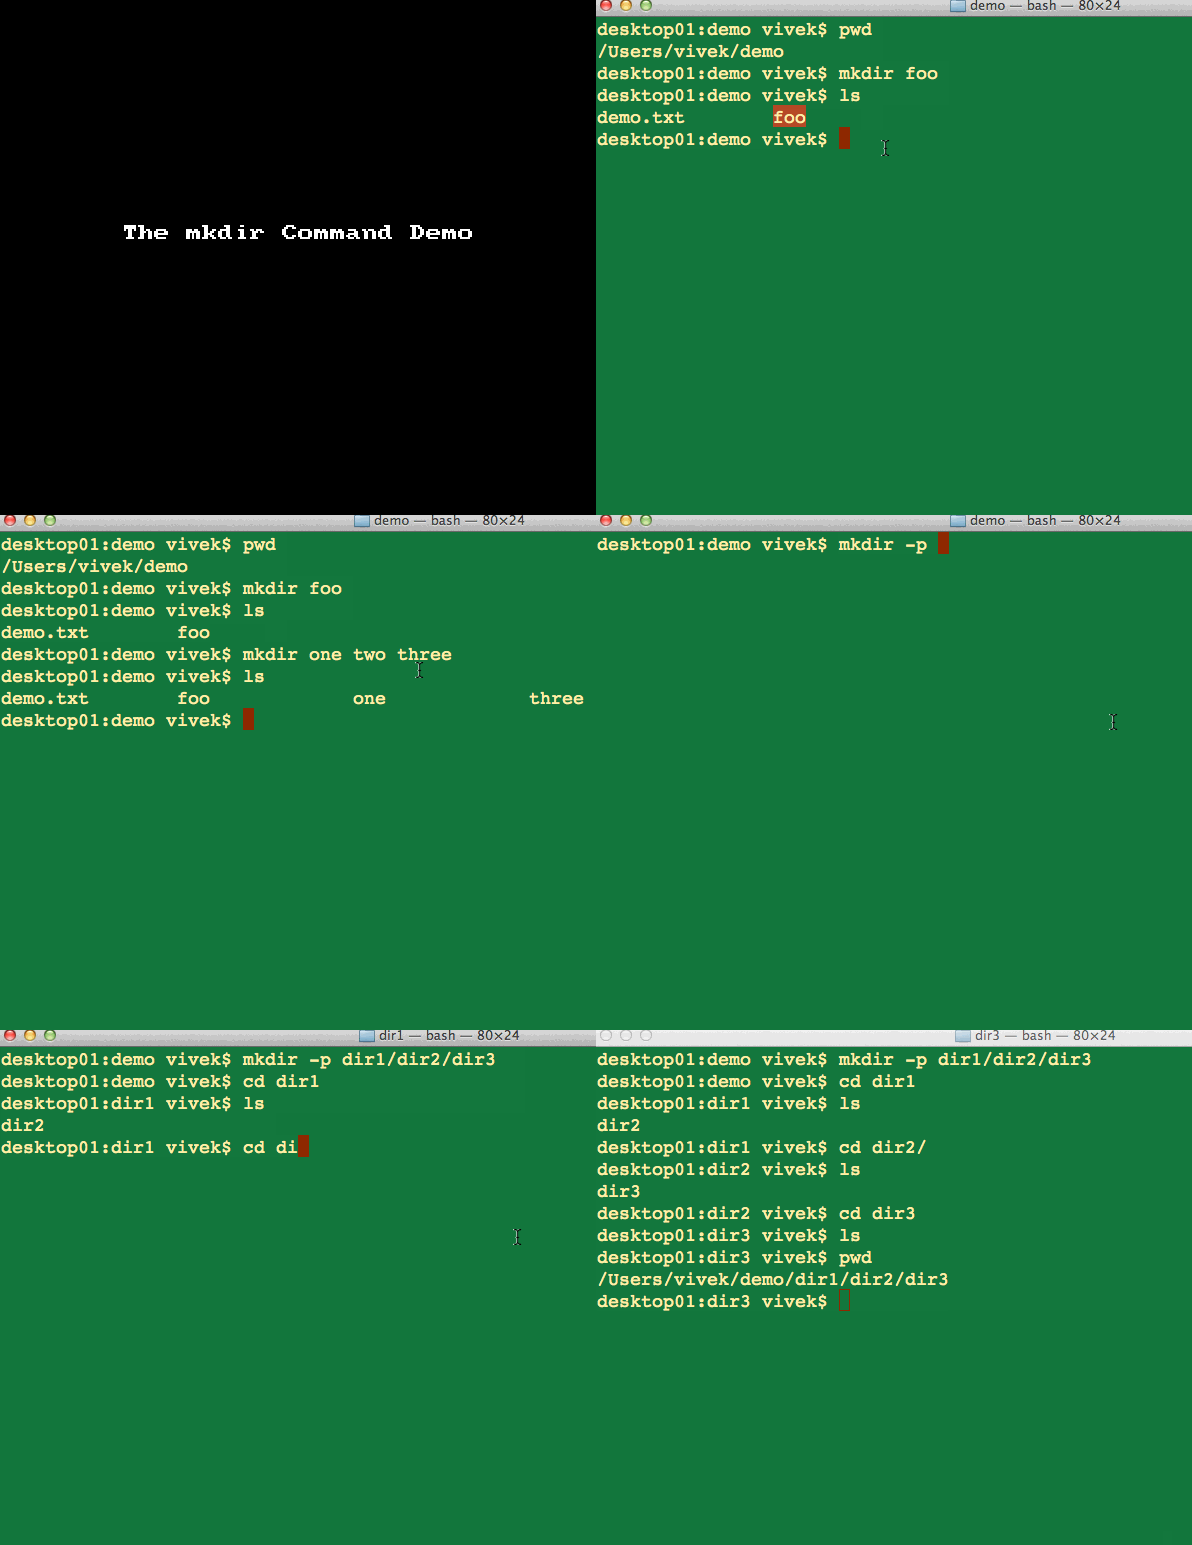
Sample mkdir demo

Animated gif 01: mkdir in action under Linux / Unix like operating systems
SEE ALSO

How To Use chmod and chown Command

How do I use chmod and chown command under Linux / Unix operating systems?
Use the chown command to change file owner and group information. Use the chmod command to change file access permissions such as read, write, and access.

chown command

chown command changes the user and/or group ownership of for given file. The syntax is:
 
chown owner-user file
chown owner-user:owner-group file
chown owner-user:owner-group directory
chown options owner-user:owner-group file
 

Examples

First, list permissions for demo.txt, enter:
# ls -l demo.txt
Sample outputs:
-rw-r--r-- 1 root root 0 Aug 31 05:48 demo.txt
In this example change file ownership to vivek user and list the permissions, run:
# chown vivek demo.txt
# ls -l demo.txt

Sample outputs:
-rw-r--r-- 1 vivek root 0 Aug 31 05:48 demo.txt
In this next example, the owner is set to vivek followed by a colon and a group onwership is also set to vivek group, run:
# chown vivek:vivek demo.txt
# ls -l demo.txt

Sample outputs:
-rw-r--r-- 1 vivek vivek 0 Aug 31 05:48 demo.txt
In this example, change only the group of file. To do so, the colon and following GROUP-name ftp are given, but the owner is omitted, only the group of the files is changed:
# chown :ftp demo.txt
# ls -l demo.txt

Sample outputs:
-rw-r--r-- 1 vivek ftp 0 Aug 31 05:48 demo.txt
Please note that if only a colon is given, or if NEW-OWNER is empty, neither the owner nor the group is changed:
# chown : demo.txt
In this example, change the owner of /foo to "root", execute:
# chown root /foo
Likewise, but also change its group to "httpd", enter:
# chown root:httpd /foo
Change the owner of /foo and subfiles to "root", run:
# chown -R root /u
Where,
  • -R - Recursively change ownership of directories and their contents.

chmod command

The information about the chmod command is covered in our previous tutorial - "how to use change user rights using chomod command".

How to Reinstall apache2 properly in linux

If you have issues with apache2 and you want to reinstall it but you are getting errors,then here it isthe solution for you.

For example, me i had an issue with apache, when i tried to start it i got this error message  :

root@pirat9-desktop:/etc/apache2# /etc/init.d/apache2   start
.: 45: Can't open /etc/apache2/envvars
Now i want to reinstall apache, but first i need to remove it completely  (If you currently have it removed improperly, reinstall it by “sudo apt-get install apache2″ before to use the command bellow). To do that i will use this command :
 sudo apt-get remove --purge apache2 apache2-utils
This command will completely remove all apache2 configuration files and directories.
- Reinstall again apache using the normal command
sudo apt-get install apache2

Now your config files and directories in /etc/apache2 all be back and at their defaults as well as the “apache2-utils previously removed.

root@pirat9-desktop:/etc/apache2# /etc/init.d/apache2   start
 * Starting web server apache2                                  using 127.0.0.1 for ServerName
httpd (pid 7235) already running   [ OK ]

Friday, May 9, 2014

Shell script that Prompts to Automatically Connect via SSH using .bash_profile in Cygwin

I wanted my cygwin terminal to automatically prompts me to login via SSH or to cancel and use local bash for whatever on my local machine. I found out the .bash_profile automatically runs on login so I made it call a external shell script with ./ssh_connect.sh to prompt for the two options of logging in by SSH or exiting the prompt and using cygwin's local bash environment.

Here is the code for ssh_connect.sh :

   1 
   2  echo "Connect SSH?"
   3  select yn in "Yes" "No"; do
   4      case $yn in
   5          Yes ) ssh user@server; break;;
   6          No ) exit;;
   7      esac
   8  done
   9 

Then update your .bash_profile with the line 

./ssh_connect.sh

Thats all you need to do.


Monday, May 5, 2014

How to Find a File in Ubuntu Linux

Use the following commands in your terminal
  • find / -iname filename or partial filename
    Find a File in Linux Step 1Bullet1.jpg
  • find / -iname *.conf

    Find a File in Linux Step 1Bullet2.jpg
  • This will find every instance conf no matter where it is.
  • The / after find tells find to look in every directory below and including the root of the filesystem.
  • The - in front of name tells Linux to not worry about caps.

You can use wildcards such as find / -iname wiki* to find, for example, "wikiHow.dat".

Find a File in Linux Step 2.jpg
  • There are many variables you can use with find.

Type "man find" or "info find" at a terminal prompt for more information then you care to know. Skip the " " when entering the commands.

Find a File in Linux Step 3.jpg
Tips
  • If the list of files is extensive, you can pipe the command to "less" so you can scroll back for forth.
    • find / -iname *.conf | less
  • If you want to send the search results into a file to be read later
    • find / -iname *.conf > ~/myfile
The tilde ~ represents your home directory so if your user name is Joe you can find the filemyfile in /home/joe.
  • The locate command will often find files much faster, but it's not always up to date.
    • locate important-paper
    • locate conf

Rename File Command Line Ubuntu Linux

You need to use the mv command. It is used to rename and move files and directories. The general syntax is as follows:
 
mv old-file-name  new-file-name
mv [options] old-file-name  new-file-name
mv file1 file2
 
In this example, the following command would rename a file called resumezzz.pdf to resume.pdf. Open a command-line terminal (select Applications > Accessories > Terminal), and then type:
 
mv resumezzz.pdf resume.pdf
 
If resumezzz.pdf is located in /home/vivek/docs/files directory, type:
 
cd /home/vivek/docs/files
mv resumezzz.pdf resume.pdf
 
OR
 
mv /home/vivek/docs/files/resumezzz.pdf /home/vivek/docs/files/resume.pdf
 
Use the ls command to view files:
 
ls -l file1
ls -l file1 file2
ls -l /home/vivek/docs/files/*.pdf
ls -l *.pdf
 

Linux rename a file syntax

In short, to rename a file:
 
mv file1 file2
 
You can get verbose output i.e. mv command can explain what is being done using the following syntax:
 
mv -v file1 file2
 
Sample outputs:
`file1' -> `file2'
To make mv interactive pass the -i option. This option will prompt before overwriting file:
 
mv -i file1 file2
 
Sample outputs:
mv: overwrite `file2'? y

Detailed information about mv command

You can also view the manual page on mv using the following command:
 
man mv
 
OR
 
info mv
 

Restart Apache Server Command Line Ubuntu Linux

To restart the web server apache in Ubuntu you can use the command sudo service apache2 restart for the way that's borrowed from Red Hat. Or sudo restart apache2 for the shiny new Upstart way.

Friday, March 14, 2014

How to setup transparent multi hop ssh

Being able to connect to remote server quickly and effortlessly is very useful while managing servers. Many times server you want to connect is behind firewall or inside other subnet and there’s no direct access to it. Here’s how you setup a transparent multi hop ssh.
First network topology. For this example Im connecting through network switch to my local server 192.168.0.2 that act as firewall and DHCP. Behind that machine is my destination host 10.10.0.2.

#1: Cofigure ~/.ssh/config

Firewall host 192.168.0.2 is going to act as my gateway. Now that we know what we want to do lets configure our ~/.ssh/config file
This is how it works. Take a closer look at ProxyCommand inside destination host declaration. It runs ssh -A command to forward ssh-agent. After switch we relay to name of previously configured host named firewall and we run command netcat command (nc).

#2: Test multi hop ssh connection

To connect to destination server simply type in your terminal
If you like me you probably want to get rid of that killed by signal message. It happens when netcat command exits. To silence that message you can add at the end of ProxyCommand 2>/dev/null
Now when you exit you will see just connection closed message.
That was super transparent in an instant we logged on to our destination machine.

- See more at: http://blog.matchgenius.com/how-to-setup-transparent-multi-hop-ssh/#sthash.r5cPBcyR.dpuf