Pages

Friday, May 30, 2014

How To Change Location Of Blockchain Data for Bitcoin-qt Client

Note : First of all Backup your Bitcoin wallet.dat and blockchain to external drive.

Instructions to move blockchain directory :

Step 1. Close your Bitcoin client, if already running.
Step 2. Locate and move Bitcoin data files.
(Windows XP)
C:\Documents and Settings\YourUserName\Application data\Bitcoin
 
(Windows Vista, Windows 7 and Windows 8)
C:\Users\YourUserName\Appdata\Roaming\Bitcoin
Step 3. Copy “ Bitcoin ” directory to another drive, for example “ E: ” drive.
Step 4. Now right click on “ Properties ” of  Bitcoin.exe ” and add following in “ Target 
-datadir=e:\BitCoin
blockchain
Step 5. Start Bitcoin, now you will see that your wallet is now loading from the new data directory.

Wednesday, May 14, 2014

Matrix Screensaver for Ubuntu Server Terminal

If you like playing around with your Terminal, you will love this cute little program that can create a small Matrix style animation in your Terminal.


Matrix in Your Terminal
The screenshot above can give you a better idea. The program is called cmatrix. And it is available in the Ubuntu repos by default.

sudo apt-get install cmatrix

Now, open Terminal and run "cmatrix". Its quite cool IMO. Do take a loot at the man page also to know the small yet different configurations available with the program.

Saturday, May 10, 2014

How to sort files into alphabetical folders with FileMonkey


The following tutorial will use FileMonkey to organize your files into alphabetical folders.

For example, all files beginning with the letter "a" will be moved into a folder named "a"

(To continuously monitor a folder for new files and then copy or move them as they appear, you should use FoldMonkey).

organize files alphabetically

Copy Move Window


1.

Target your files. Click HERE for a targeting tutorial.

2.

Select the "Quick-Find, Copy" menu item from the main window.

3.

The "Copy Or Move Files" window should now be open

4.

Set up the window as shown in this example.


5.

If you wish to copy the files to their new location rather than move them, select "Copy Files To:" from the drop down box at the top of this window.

By default, we have entered the folder "C:\Dest" to create the new folders and move the files to. If you wish to use another folder then you need to edit this line to reflect the new location.

To enter the tag: <CustSub;1;1> you can use the menu system on the right of this text box. Click the "<" button and select the "Insert Tags \ Add File Name Sub Text \ Custom Sub String..." menu item.

6.

If you are targeting files in the initial root folder, the first 5 will be displayed in the preview pane. Here, you will be able to preview the new locations before you begin the operation.

7.

When ready, click on the "Start" button to start the operation.

Friday, May 9, 2014

Filezilla Command-line arguments (Client) - Automatically connect to Site Manager Server with Shortcut

These are the command-line arguments for FileZilla Client. The Server command-line arguments can be found under Command-line arguments (Server).

Contents

 [hide

FileZilla Client command-line arguments

Synopsis

filezilla [<FTP URL>]
filezilla -h, --help
filezilla -s, --site-manager
filezilla -c, --site=<string>
filezilla -l, --logontype=<string>
filezilla -a, --local=<string>
filezilla --close
filezilla --verbose
filezilla -v, --version

Options

  • <FTP URL>
Accepts all URLs of the form
[protocol://][user[:pass]@]host[:port][/path]
eg.  sftp://username:password@server:port
Valid protocols are ftp:// (the default if omitted), ftps://ftpes:// and sftp://
  • -h, --help
Shows the help dialog.
  • -s, --sitemanager
Start with opened Site Manager.

May not be used together with -c nor with URL parameter.
  • -c, --site=<string>
Connect to specified Site Manager site.

Site name requirements:
  • Site has to be given as complete path, with a slash as separation character.
  • Any slash or backslash that is part of a segment has to be escaped with a backslash.
  • Path has to be prefixed with 0 for user defined entries or 1 for default entries.
  • Site path may not contain double quotation marks.

Example:
filezilla --site="0/foo/bar/sl\/ash"
Connects to the user site "sl/ash" in the site directory "foo/bar".

  • -l, --logontype=(ask|interactive)
Logon type, can only be used together with FTP URL. Argument has to be either 'ask' or 'interactive'.

FileZilla will ask for any logon information not supplied in the FTP URL before connecting. Useful for custom scripts or shortcuts.

  • -a, --local=<string>
Sets the local site (left-hand side) to the given path. (Requires version 3.7.1-rc1 or higher)

Use double quotation for paths with spaces in them.

Example:
filezilla --site="0/site1" --local="C:\site1 downloads"
filezilla ftp://username:password@ftp.server2.com --local="C:\server2 downloads"
Connects to the user site "site1" and sets the local folder to C:\site1 downloads.
Connects to server2 URL and sets the local folder to C:\server2 downloads.

  • --close (Windows only)
Closes all running instances of FileZilla.
  • --verbose
Verbose log messages from wxWidgets.
  • -v, --version
Print version information to stdout and exit.

Example

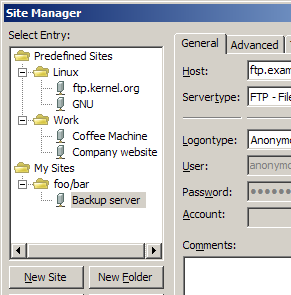
Cmdline argument example.png
If you want to connect from the command-line to the site named Backup server in the directory foo/bar, the command is:
filezilla -c "0/foo\/bar/Backup server"

Shell script that Prompts to Automatically Connect via SSH using .bash_profile in Cygwin

I wanted my cygwin terminal to automatically prompts me to login via SSH or to cancel and use local bash for whatever on my local machine. I found out the .bash_profile automatically runs on login so I made it call a external shell script with ./ssh_connect.sh to prompt for the two options of logging in by SSH or exiting the prompt and using cygwin's local bash environment.

Here is the code for ssh_connect.sh :

   1 
   2  echo "Connect SSH?"
   3  select yn in "Yes" "No"; do
   4      case $yn in
   5          Yes ) ssh user@server; break;;
   6          No ) exit;;
   7      esac
   8  done
   9 

Then update your .bash_profile with the line 

./ssh_connect.sh

Thats all you need to do.


How to prompt for input in a Linux shell script

The simplest and most widely available method to get user input at a shell prompt is the 'read' command. The best way to illustrate its use is a simple demonstration:
while true; do
    read -p "Do you wish to install this program?" yn
    case $yn in
        [Yy]* ) make install; break;;
        [Nn]* ) exit;;
        * ) echo "Please answer yes or no.";;
    esac
done
Another method, pointed out by Steven Huwig, is bash's 'select' command. Here is the same example using select:
echo "Do you wish to install this program?"
select yn in "Yes" "No"; do
    case $yn in
        Yes ) make install; break;;
        No ) exit;;
    esac
done
With select you don't need to sanitize the input... it prompts you with your choices, and you type a number corresponding to the choice you want. Select also loops automatically... there's no need for a 'while true' loop to retry if they give invalid input.

How to create a Windows Batch file that does not show the Command Prompt when executed

Executing a batch file with the built in Command Prompt is going to keep a window open until the batch file exits.
What you can do is take steps to make sure that the batch file exits as quickly as possible. If at all possible, modify the batch file to run whatever program with the start command. By default, startreturns immediately without waiting for the program to exit, so the batch file will continue to run and, presumably, exit immediately. Couple that with modifying your shortcut to run the batch file minimized, and you'll only see the taskbar flash without even seeing a window onscreen.
One caveat to this is that if you're running a console-mode program, which many script interpreters are, the batch file will wait for the program to exit, and using start will spawn a new console window. What you need to do in this case is run the Windows-based version of the interpreter instead of the console-based one -- no start necessary. For Perl, you would run wperl.exe instead of perl.exe. For Python, it's pythonw.exe instead of python.exe. The old win32 Ruby distribution I have downloaded has rubyw.exe, which should do the same thing.
A final possibility is to use a 3rd-party tool to run the command prompt with a hidden window. I've heard of such things but never had a use for them, so I don't know of anything in particular to point you to.

START /B batchfile

Autorun SSH when starting cygwin from cmd, log into Bash and running ssh command


AutoSSH.bat contents:

START C:\cygwin\bin\mintty /bin/bash/ -l -c "ssh user@server"

Monday, May 5, 2014

Display Image on Top of Windows 7 Desktop Wallpaper - Overlap Wallpaper

Overlap Wallpaper Displays a Second Image on Top of Your Wallpaper, Keeps You Organized
Windows only: Changing up your desktop wallpaper can be really fun, but if you want a certain image on your desktop at all times, Overlap Wallpaper takes any image on your computer and displays it over your desktop.P
Overlap Wallpaper Displays a Second Image on Top of Your Wallpaper, Keeps You OrganizedSEXPAND
There are any number of things you might want to keep on your desktop, whether it be something aesthetic, like a picture of your family, or something more useful, like your daily schedule. Overlap Wallpaper is a neat utility that lets you display an image on top of your wallpaper, giving you the ability to keep that important image close without giving up your giant stash of rotating NASA wallpapers. What you put on that image is up to you, and can serve any number of uses. You could display daily reminders, list important phone numbers and other quick-access info, or even show a list of your long-term goals to help keep your mind on track. I'm currently using it to display a small version of the Lifehacker daily schedule so I stay on top of my deadlines.P
If there's one complaint I have, it's that it display's the image over everything on your desktop; that is, any desktop icons will fall under it instead of on top. If you could put icons on top of it, it'd be a great way to keep your desktop organized without giving up the wallpapers you love. Overall, though, it's a cool program, that you can use to keep yourself on task or just to add a bit more spice to your desktop.P
Overlap Wallpaper is a free download for Windows only.

How turn on error messages to get useful error messages in PHP

PHP Configuration

2 entries in php.ini dictate the output of errors:
  1. display_errors
  2. error_reporting
In productiondisplay_errors is usually set to Off (Which is a good thing, because error display in production sites is generally not desirable!).
However, in development, it should be set to On, so that errors get displayed. Check!
error_reporting (as of PHP 5.3) is set by default to E_ALL & ~E_NOTICE & ~E_STRICT & ~E_DEPRECATED (meaning, everything is shown except for notices, strict standards and deprecation notices). When in doubt, set it to E_ALL to display all the errors. Check!

Whoa whoa! No check! I can't change my php.ini!

That's a shame. Usually shared hosts do not allow the alteration of their php.ini file, and so, that option is sadly unavailable. But fear not! We have other options!

Runtime configuration

In the desired script, we can alter the php.ini entries in runtime! Meaning, it'll run when the script runs! Sweet!
error_reporting(E_ALL);
ini_set("display_errors", "On");
These two lines will do the same effect as altering the php.ini entries as above! Awesome!

I still get a blank page/500 error!

That means that the script hadn't even run! That usually happens when you have a syntax error!
With syntax errors, the script doesn't even get to runtime. It fails at compile time, meaning that it'll use the values in php.ini, which if you hadn't changed, may not allow the display of errors.

Error logs

In addition, PHP by default logs errors. In shared hosting, it may be in a dedicated folder or on the same folder as the offending script.
If you have access to php.ini, you can find it under the error_log entry.

How to Find a File in Ubuntu Linux

Use the following commands in your terminal
  • find / -iname filename or partial filename
    Find a File in Linux Step 1Bullet1.jpg
  • find / -iname *.conf

    Find a File in Linux Step 1Bullet2.jpg
  • This will find every instance conf no matter where it is.
  • The / after find tells find to look in every directory below and including the root of the filesystem.
  • The - in front of name tells Linux to not worry about caps.

You can use wildcards such as find / -iname wiki* to find, for example, "wikiHow.dat".

Find a File in Linux Step 2.jpg
  • There are many variables you can use with find.

Type "man find" or "info find" at a terminal prompt for more information then you care to know. Skip the " " when entering the commands.

Find a File in Linux Step 3.jpg
Tips
  • If the list of files is extensive, you can pipe the command to "less" so you can scroll back for forth.
    • find / -iname *.conf | less
  • If you want to send the search results into a file to be read later
    • find / -iname *.conf > ~/myfile
The tilde ~ represents your home directory so if your user name is Joe you can find the filemyfile in /home/joe.
  • The locate command will often find files much faster, but it's not always up to date.
    • locate important-paper
    • locate conf

Rename File Command Line Ubuntu Linux

You need to use the mv command. It is used to rename and move files and directories. The general syntax is as follows:
 
mv old-file-name  new-file-name
mv [options] old-file-name  new-file-name
mv file1 file2
 
In this example, the following command would rename a file called resumezzz.pdf to resume.pdf. Open a command-line terminal (select Applications > Accessories > Terminal), and then type:
 
mv resumezzz.pdf resume.pdf
 
If resumezzz.pdf is located in /home/vivek/docs/files directory, type:
 
cd /home/vivek/docs/files
mv resumezzz.pdf resume.pdf
 
OR
 
mv /home/vivek/docs/files/resumezzz.pdf /home/vivek/docs/files/resume.pdf
 
Use the ls command to view files:
 
ls -l file1
ls -l file1 file2
ls -l /home/vivek/docs/files/*.pdf
ls -l *.pdf
 

Linux rename a file syntax

In short, to rename a file:
 
mv file1 file2
 
You can get verbose output i.e. mv command can explain what is being done using the following syntax:
 
mv -v file1 file2
 
Sample outputs:
`file1' -> `file2'
To make mv interactive pass the -i option. This option will prompt before overwriting file:
 
mv -i file1 file2
 
Sample outputs:
mv: overwrite `file2'? y

Detailed information about mv command

You can also view the manual page on mv using the following command:
 
man mv
 
OR
 
info mv