Pages

Wednesday, November 19, 2014

Apple iPhone 5s iOS 7.1.0 : When ever I send a text message, the message disappears

This is NOT a carrier issue.

 First if all, there's no way the carrier can delete messages from your messages app. Second, after a reboot the messages come back. So please stop with the take it up with the carrier nonsense. This IS an iOS problem.

 Secondly, I'm having the exact same issue but it happens with BOTH (gasp!) iMessage and SMS.

 My text messages would show up for a split second and then disappear; Green bubbles for SMS and Blue bubbles for iMessage would quickly vanish after I sent them. This problem started happening after my phone lost sync with date/time (I changed the date to 2012 accidentally). I reset the date and time and now messages don't disappear anymore.

There were also problems loading webpages, I would always get "Safari Can’t Verify the Identity of the Website" This occurred because the system clock and date was not the current date, so SSL certificates were being considered invalid. These messages stopped after I fixed the date/time.

Here is a guide I followed:
Confirm the System Time is Correct
·        If you’re still having the problem, your time settings may be off. Yes, time, as in the clock on the computer. If that’s the problem, it’s quite easy to resolve:
·        Be sure the iPhone has active internet access, this is necessary to retrieve accurate date and time info from Apple servers
·        Quit Safari
·        Open the iPhone settings menu and go to General
·        Choose “Date & Time” and check the box for “Set automatically”
·        Relaunch Safari
You should be good to go with no more verification errors. This works for situations where the system time is reporting as vastly different than what is expected from the remote server, like if a computer is reporting itself from the future.

Wednesday, September 10, 2014

Using GIMP, easiest way to repeat an image in a tiled fashion

  • Filters → Map → Tile...
  • Disconnect vertical and horizontal scales (break the "chain" between them).
  • Switch the units to percentage (%).
  • Enter 500 % for the width, 100 % for the height.
screenshot

How to bypass trial restrictions with vmware thinapp (Use it forever)

Disclaimer :- I don't support cracking/bypassing any software in any way. The information is for educational purpose only, use at your own risk. 

This post will explain how we can use vmware thinapp and run any trial application forever with little hassle and outside help. 

You will need Vmware Thinapp (and Vmware Workstation/Player for using this). There me be other free alternatives but i have not explored them as of now. I'll give example of using SSH Explorer  for demonstration.Please see disclaimer, and buy this software if you like, it will help fund many software engineers around the world.

I have windows 7 installed in Vmware Workstation, with Vmware thinapp installed on the same.
Although you can see guides for Thinapp for Virtualizing SW, i l illustarate settings for ssh explorer here in Section 1. you can off course modify many stages using other tutorials on thinapp.


The applications are tested on Vmware workstation as well on the real system, I'll show the illustration on workstation only.

The main point that enables use trial SW for ever is that Thinapp allows us to store all the information that the application needs, wither registry/programfiles/settings etc in single directory. It is in a way similar to trick application that its still running in past by changing system date/using SW that makes it run in particular date. But many SW which synchronize with internet wont work in this fashion.


Section 1: Make the Single EXE for application using Thinapp.I'll illustrate for SSH Explorer only

  1. Using Thinapp, do a prescan of the system, please keep the installer of your application in the OS before doing prescan. As thinapp compares prescan and postscan to package the data into single exe (you dont want your installer to be included in package as well :)


  2. Install the application (in this case ssh explorer), don't close the thinapp window. 
  3. Do a post scan

  4. Select the entry point, off course for simple application you only want the application itself not the uninstaller and stuff. Entry point is the Exe that will be run when click the generated EXE. For products like adobe CS 4, you'll use multiple entry points. Here i use only one.


  5. Enable all groups to run package (Or use a particular group if you want to).


  6. You dont want your application to write data here and there (offcourse for using trial unlimited), so use restricted write access.

  7. Now select same directory as application, this is again for the same reason, you will delete the application data folder as illustrated below (after saving settings).


  8. Helping Vmware or not, is your choice (Popup to send data to vmware on usage pop)
  9. Inventory name is the folder were the generated Exe will be stored, and the application specific data will be kept of the final generated exe. Choose accordingly.


  10. Primary data container is read only file, so keeping it within exe does no harm. MSI is not generated in this case neither the package is compressed (might affect later performance also).


  11. Warnings are usually for files that are not copied (like log files etc, you can skip those or retry if the application fails in the end) (click next here)
  12. Click build to generate  final single exe of entire application.

  13. Click finish to open folder to see the generated application and other files if you choosed them (here only single exe is shown).


  14. Copy these exe for using the SW forever :) See Section 2 for how to
Section 2:  How to make the application run forever 

Now each application has its own data (like personal preferences, connection settings etc). You will need to look for the generated folder for the settings.

In this case settings are stored in the folder SSH Explorer\%ProgramFilesDir%\SSH Explorer


Copy the files conn.ini ,settings.ini and snippets.ini for later use (you dont want to reconfigure the SW again). 


Delete the folder "SSH Explorer" , the folder you provided for Inventory name. All the registry and other settings will be erased. 


Start SSH Explorer again and you will have your folder recreated, replace the files we copied earlier. and voila you are done :). 

Similar procedure is to be followed for all other SW. 

Delete All Wordpress Comments at Once

The can use phpMyAdmin to execute this SQL
DELETE FROM wp_comments WHERE comment_approved = 0
Of course if your comments table is prefixed with wp_ you will need to use the correct table name.

Tuesday, September 9, 2014

Download Files from Scribd for Free Without an Account

 In this article we will be seeing how to download PDF documents from Scribd without having an account, paying or uploading documentsScribd is considered to be one of the best place of resource containing valuable documents and files covering almost all fields. It allows user to view documents online with the need of any account. But at times you might prefer to download docs for later or offline access. It does provides you an option of downloading files in PDF format but with some restrictions like you need to have an account to login or should connect via Facebook ,then to download the file you should either pay subscription fee or upload some document. Previously you can by pass this restriction by printing files using virtual PDF printer and saving it to your disk. But now Scribd changed the way in which you can print, as of now you have to download the document to get it printed hence the download restriction automatically comes into picture. When you are in a hurry these restrictions are sure to bring you frustration. So lets see how to by pass them.
download from scribd without paying or uploading

How To Download Files from Scribd for Free Without Having an Account or Uploading Documents:

You can use any of the following methods
  • Greasemonkey Scribd Downloader Script:

  • 1. If you are a Firefox user, first install Greasemonkey add-on on your browser. If you are a chrome user you need not install this add-on you can proceed to next step.
    2. Install this Scribd Downloader Script .
    3. Now as usual view the documents in Scribd and click the download button available at the bottom right. You will be prompted to open or save the file, rename and save it as you wish.
  • Scribd Mobile Site to Download Documents:

  • If you are not comfortable with installing scripts use this manual method. Actually above script internally does this.
    1. Note down the unique ID of the document from the url.
    Eg:
    http://www.scribd.com/doc/60232123/abcdef
    2. Go to Scribd mobile optimized site.
    3. Enter the ID you noted down and click search.
    4. Now save the file by clicking on Download Now button.
    [Update- May 05,2012]
    One of our reader’s Tony has mentioned that his browser is being redirecting back to original URL of the eBook on clicking Download Now button. This is probably because of late Scribd has changed it’s way of handling different user agents. So here is a new fix for it.
    1. Install User Agent Switcher add-on and restart your browser.
    2. Follow the above steps till step 3. Just do a search and keep, don’t click the download button.
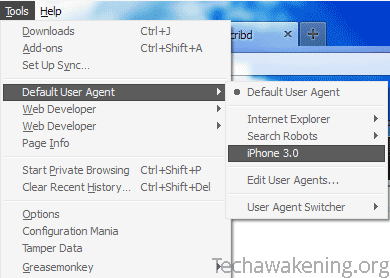
    3. Now go to Tools-> Default User Agent-> iPhone 3.0. Now click the button. You will be able to download as usual again.
    Changing user agent in Firefox
    [Update- May 28,2012]
    Biblio has mentioned that the updated user agent fix has stopped working. Here is a new fix. Just an additional step to the latest fix. This time you need to change form method attribute to get rid of the error message.
    1. Install Firebug add-on and restart your browser.
    2. Follow the above method till step 2.
    3. Press Ctrl+Shift+C to open Firebug HTML inspect mode.
    4. Hover over the download button. You will find that form tag is highlighted in the code section below. Click post and change it to get i.e. method=”post” to method=”get”
    Change scribd form method attribute
    5. Now as before change the user agent and click download.
    [Update- July 08,2012]
    Yet again there has been an update to existing system. Here is the updated version.
    1. First change the user agent string to Android then go to mobile site and search for the doc using the unique ID or directly go to the concerned document.
    2. Now directly hit the download button.
    [Update- Sept 29,2012]
    This time after a long wait, I was able to find a workaround. Here’s how it goes.
    1. Download and install any PDF printer. For e.g. PrimoPDF
    2. Go to the appropriate document you need. From URL note the unique ID as usual.
    3. Right click on the page and select View Page Source. And search for access_key and note down the string which is between the quotes.
    E.g. key-13davbcdewnewn9m5w02
    4. Now modify ID, access key and replace it with one’s you have noted down. Then paste it in address bar and hit enter.
    http://d1.scribdassets.com/ScribdViewer.swf?document_id=108992419&access_key=key-13davbcdewnewn9m5w02
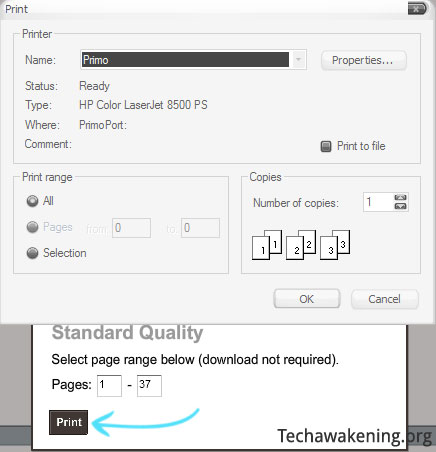
    5. Click on the print link in top left corner. In the pop up that comes up select print which is under standard quality.
    Download from scribd for free by printing
    6. Now you need to select primo as name of your printer. And click OK.
    7. In the PrimoPDF window that comes up, click create PDF then select a location and save it.
    *Note: Above trick is not guaranteed to work against all documents though.
    [Update- March 01,2014]
    1. Go to the concerned document and click Download or Print button on the right.
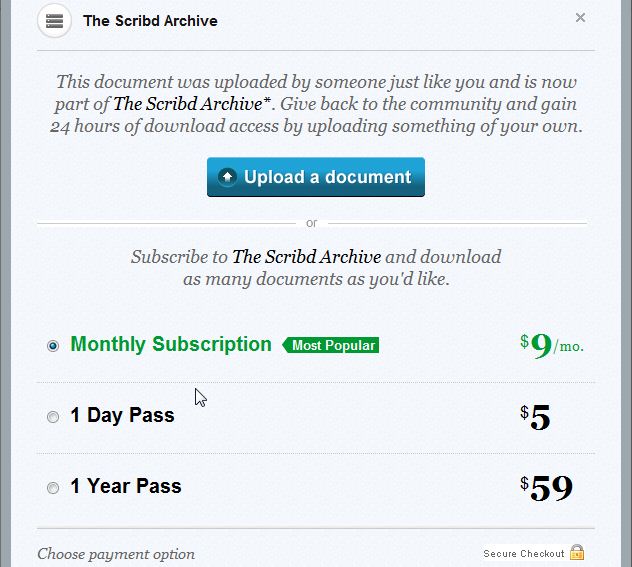
    2. You will be redirected to a page which asks you to pay or contribute to get the document.
    Download from Scribd for free by uploading new files
    3. Click on upload and select any valid text file with some content in it. Preferably type your own content, because the system checks for duplication. Or if you have some helpful document which might be useful to others, well and good you can upload that.
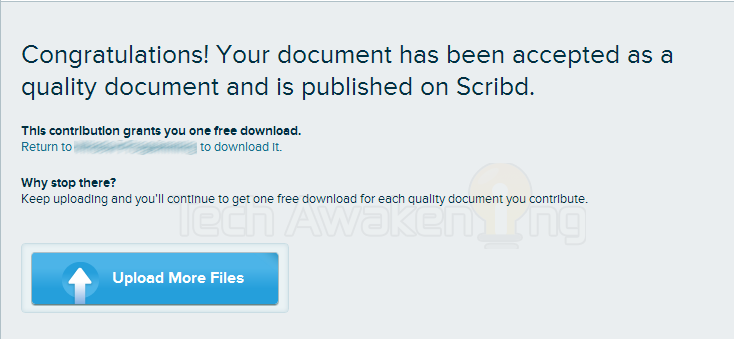
    5. Give some title, description and click on save and continue. You will be getting a success message as below.
    download from Scribd for free by uploading documents

Download Embedded HTML5 Scribd Document with access key

    Biblio has mentioned that the updated user agent fix has stopped working. Here is a new fix. Just an additional step to the latest fix. This time you need to change form method attribute to get rid of the error message.
    1. Install Firebug add-on and restart your browser.
    2. Follow the above method till step 2.
    3. Press Ctrl+Shift+C to open Firebug HTML inspect mode.
    4. Hover over the download button. You will find that form tag is highlighted in the code section below. Click post and change it to get i.e. method=”post” to method=”get”
    Change scribd form method attribute
    5. Now as before change the user agent and click download.
    [Update- July 08,2012]
    Yet again there has been an update to existing system. Here is the updated version.
    1. First change the user agent string to Android then go to mobile site and search for the doc using the unique ID or directly go to the concerned document.
    2. Now directly hit the download button.
    [Update- Sept 29,2012]
    This time after a long wait, I was able to find a workaround. Here’s how it goes.
    1. Download and install any PDF printer. For e.g. PrimoPDF
    2. Go to the appropriate document you need. From URL note the unique ID as usual.
    3. Right click on the page and select View Page Source. And search for access_key and note down the string which is between the quotes.
    E.g. key-13davbcdewnewn9m5w02
    4. Now modify ID, access key and replace it with one’s you have noted down. Then paste it in address bar and hit enter.
    http://d1.scribdassets.com/ScribdViewer.swf?document_id=108992419&access_key=key-13davbcdewnewn9m5w02
    5. Click on the print link in top left corner. In the pop up that comes up select print which is under standard quality.
    Download from scribd for free by printing
    6. Now you need to select primo as name of your printer. And click OK.
    7. In the PrimoPDF window that comes up, click create PDF then select a location and save it.
    *Note: Above trick is not guaranteed to work against all documents though.

Using the RSS Downloader Plugin in ruTorrent Web Interface

ruTorrent is a web-based user interface (webUI) for the popular bittorrent client rTorrent. You access it through your browser from any computer connected to the internet. Apart from having an excellent, very much uTorrent-like user interface, it extends rTorrent's functionality considerably through the use of plugins. You will be able to create torrents, use rss feeds, delete torrents with data, choose custom locations for data, use labels, sort your torrents by label, tracker, ratio, name, state, peers, seeds, creation date, etc, and more.
Plugins
On Feral servers ruTorrent is autoinstalled (using the Software Manager page) with a recommended set of plugins.
Explore all the available plugins. Should you wish to try any of them apart from those that came preinstalled with your ruTorrent, just upload them to rutorrent/plugins that is located inside your Default WWW location.
~/www/**username**.**servername**.feralhosting.com
IMPORTANT: there should be a separate directory for each plugin inside [b]rutorrent/plugins. To uninstall a plugin, just delete the whole dir with the plugin in it.[/b]
Currently available plugins (Feral recommended plugins appear in bold):
1: RPC — plugin for linking rtorrent and a web server (required for Feral); 2: erasedata — adds the "Delete with data" option to the context menu in the downloads area; 3: darkpal — a dark interface theme; 4: choose — adds a button to the new downloads dialog for comfortable navigation through the server file system; 5: сreate — adds a command for making torrents; 6: trafic — traffic registration subsystem; 7: RSS — RSS-feeds; 8: edit — real-time trackers list editing;9: throttle — separate speed limits for download groups; 10: retrackers — automatically adds required re-trackers for new downloads; 11: cookies — allows to configure a set of cookies for trackers that require cookie-based authentication;12: search — allows to customize search engines; [May give error "error: [21.01.2010 21:29:30] Error: torrent is doesn't passed to rTorrent."] 13: scheduler — configurable speed limits for downloading/uploading depending on hour of day and day of week; 14: autotools — automation functions (autolabel, automove); 15: datadir — allows to change data location on per torrent basis; 16: tracklabels — adds tracker autolabels to the categories pane; 17: ratio — separate ratio limits for download groups (requires rtorrent 0.8.5+); 18: seedingtime — additional column in the main view — shows date/time when a particular torrent finished downloading and started seeding (requires rtorrent 0.8.5+):
Using the RSS Downloader Plugin
**Please be very careful with this plugin**. Filters need to be setup correctly for it to download only 
what you want, and not everything in the feed. Errors in the setup may harm your ratio or, in the worst 
scenario, destroy it completely.

**Do test your setup properly before configuring the plugin to autodownload!**
Set up your filters and leave the plugin running for about a day, then examine the results and verify that 
your filters are actually filtering out the right stuff!
Click on the RSS Downloader button in the top toolbar. Add the URL of your feed. Add an alias for the feed — your feed will show up under this name in the RSS section of the left sidebar.
Click OK. If your feed contains a pass key in its URL and your tracker does not require a cookie to access the feed, RSS Downloader will connect to the feed and display the most recent items. It will not download any .torrents at this point.
Right-click on the feed alias in the left sidebar and choose RSS Manager.
We need to configure at least one filter for the plugin to use with the feed. Click the Add button and give your filter a name. Let's say, we want to download everything in the feed.
Copy and paste the following line into the Filter field:
/()/i
Leave the Exclude field empty. From the RSS dropdown choose the alias of the feed the filter will be applied to (SCC in our case). Leave the directory field empty — RSS Downloader will download .torrents to the default location —/rutorrent/torrents — and load them from there. Be sure to tick "Don't start the download automatically" — at this moment we are just testing our filters. The Label field is optional — if filled out, downloaded .torrents will be auto-labeled using this value (useful for sorting jobs by label).
The ? button allows you to test your filter in real time against the items in the feed. Click it, and RSS Downloader will respond with a number of matches, and highlight all matching items in the list.
Our filter correctly matched 15 items out of the 15 currently available in the feed. Press OK. RSS Downloader should download all .torrents in the feed and add them as stopped to the queue. Verify it, and if everything is working as it should, return to RSS Manager and untick the "Don't start the download automatically" setting. Reload ruTorrent in your browser for the new settings to take effect.
Do test your setup properly before configuring the plugin to autodownload! Set up your filters and leave the plugin running for about a day, then examine the results and verify that your filters are actually filtering out the right stuff!
ADVANCED SCENARIOS
Download only .torrents with VA- in the name:
Download only .torrents with the words Pepe or Strict or Gypsy in the name (use the pipe sign | to separate tokens):
Download only .torrents with the words Pepe or Strict or Gypsy in the name, but exclude anything with 2006 in the file name:
Download only .torrents with the words weeds OR (prison AND break) OR (rescue AND me) OR heroes in the file name:
/(weeds|prison.*break|rescue.*me|heroes)/i
Please consult this tutorial for a more detailed overview of the syntax and usage examples (thanks to user drunkpitbull).
OTHER OBSERVATIONS
If you auto-installed ruTorrent from the software manager page, the default feed update interval is set to 30 min. Should you wish to change this setting, connect to your slot via FTP/SFTP and edit the following file:
/home/username/www/.../rutorrent/plugins/rss/conf.php
Consult with your tracker regarding the minimum allowed rss poll interval on this specific tracker (the tracker's forum would be a good place to ask). Do not joke with it — your IP will most likely get banned by the tracker if you request the feed way too frequently.
WAFFLES.FM
Until further notice, Waffles.FM banned OVH IP ranges from accessing the website, while still allowing access to the tracker. You will thus be able to use your Feral box to download/upload stuff from/to Waffles.FM, but you won't be able to access Waffles.FM website using Feral VPN / SSH tunnel or use Waffles.FM RSS feeds directly on your Feral box. See this guide for a possible workaround.

Pidgin Install Spell-checking support manually

Versions 2.7.0 and newer use the dictionaries available from the openoffice extension download site. You need to download the appropriate language extension file(s) (files are openoffice extensions *.oxt, which are just zip files that contain additional data). Once you have downloaded a dictionary extension file, you can rename it so it has a .zip extension and then extract the *.dicand *.aff files in it to <Pidgin Installation Directory>\spellcheck\share\enchant\myspell\ (create the directories if they don't exist already).
If Pidgin is running, it will need to be restarted for new dictionaries to be recognized.
Versions older than 2.7.0 use Aspell; you can download both the Aspell core and a dictionary from the win32 Aspell website.