Pages

Tuesday, January 8, 2013

Windows 7 Upgrade Guide for dv6000/dv9000 models - Drivers

I had to use sp42635.exe as my nividia driver for HP Pavillion dv6000 running Windows 7.
I also had to run it as administrator and under Vista compatibility mode. 
 http://h10025.www1.hp.com/ewfrf/wc/softwareDownloadIndex?cc=us&lc=en&dlc=en&softwareitem=ob-70238-2

CHIPSET DRIVERS 
Solution on COPROCESSOR with yellow exclamation mark () 


If you have Intel processor:

Intel Chipset (Install and reboot before other drivershere (ver 9.1.1.1025 for 32/64 bit Win7)

Intel Rapid Storage Technology here (ver 10.1.2.1004 for 32/64 bit Win7)

If you have AMD processor:

For dv60xxdv61xxdv62xxdv63xxdv64xxdv90xxdv91xxdv92xxdv93xx and dv94xx models (example: dv6367am means that your model is dvx3xx, dv9421xw means that your model is dv94xx):
nVidia Chipset (Install and reboot before other drivershere   (Vista)

For dv65xxdv66xxdv67xxdv68xxdv69xxdv95xxdv96xxdv97xxdv98xx and dv99xx models (example: dv6981tu means that your model is dv69xx, dv9721tu means that your model is dv97xx):
nVidia Chipset (Install and reboot before other drivershere   (Vista)

Important information for users with nVidia chipset!
If you have 4GB of RAM or more then check Microsoft knowledge base article about solution on some problems which you may have here.


GRAPHIC DRIVERS


Intel Graphic:

    Intel 950 and Intel X3100 here (ver 15.12.75.4.1930 for Win7 32 bit) or here (ver 15.12.75.4.1930 for Win7 64 bit)

nVidia  Graphic:
       
  Important information!

   If you have installed any nVidia drivers for graphic card then before you will install other version you will need to remove old drivers
    first. Check below guide how to do it (this is not standard uninstallation process):


   Drivers:

    nVidia GeForce 8400M GS and nVidia GeForce 8600M GS:

         OPTION 1

         Version 267.76 here for Windows 7 32 bit or here for Windows 7 64 bit.

         OPTION 2

         Version 197.16 here for Windows 7 32 bit or here for Windows 7 64 bit.

         Note:
         Remember to uninstall previous graphic card driver first.


    nVidia GeForce GO 6150M, 7150M, 7200M, 7400M or 7600M:

          OPTION 1

          First try to install original Vista drivers for your model.

          Resource:


           OPTION 2

           If original drivers will not work then try modded drivers ver 195.81.

        Note:
        Remember to uninstall previous graphic card driver first.

        How to install them under Windows 7?

           1. Download driver here (for Win7 32 bit) or here (for Win7 64 bit) double click and select extract,

           2. Download from this site with drivers also INF Modified and replace original INF in extracted folder,

           3. Install & reboot.


     OPTION 3

           Last thing which you may do is installing graphic driver from Windows Update.

        Note:
        Remember to uninstall previous graphic card driver first.

     1.Open Windows Update by clicking the Start button Start.png, clicking All Programs ', and then clicking 'Windows
             Update '.

     2.In the left pane, click ' Check for updates ' , and then wait while Windows looks for the latest updates for your computer.

     3.Select the ' Optional Updates ' and install from there only driver for your graphic card.


AUDIO DRIVERS


Conexant HD Audio

         Use original Vista drivers for your model.

         Resource:


Realtek HD Audio 
       
         Use original Vista drivers for your model.

         Resource:

         If Vista drivers will not work well for You then try to use official Realtek one from here (for 32/64 bit Win7). 
         When you will enter this link check there "I accept to the above." and after that click ' Next ' button.


MODEM DRIVERS


Conexant Modem here (ver 7.61.0.0 A)   (Vista) - If you have Conexant audio card

Motorola SM56 Modemhere (ver 6.12.6.0 A)   (Vista) - If you have Realtek audio card


HP QUICK PLAY 


HP QuickPlay here (ver 3.7 v.6112 for 32/64 bit Win7)

Notes:

  • It must be installed before HP Quick Launch Buttons.
  • You've installed this software and it hangs while using?
      Uninstall your current HP QUICK PLAY version and install this which you had in Vista.

      Resource:

      If you burned CD/DVD with C:\swsetup folder as suggested in guide then you will find it there.


HP Quick Launch Buttons
Solution on KEYBOARD FILTER with yellow exclamation mark ()  


HP Quick Launch Buttons here (ver 6.50.13.1 for 32/64 bit Win7)


WIRELESS DRIVERS


Intel Wireless here (ver 13.0.0.107 for 32/64 bit Win7)

Broadcom Wireless here (ver 5.60.48.35  for 32/64 bit Win7)

Atheros Wireless here (ver 8.0.0.316  for 32/64 bit Win7)

HP Wireless Assistant here (ver 3.50.12.1 for 32/64 bit Win7)

Bluetooth Wireless here (ver 6.5.0.2000  for 32/64 bit Win7Only for models with Bluetooth.

Note:
How to install Bluetooth driver?
Check the link below:


ETHERNET DRIVERS


Realtek RTL8101 Lan here  (for 32/64 bit Win7Only for models with Intel processor.

Models with AMD processors don't need to install any extra file for ethernet., because drivers for it are in chipset package.


CARD READER
Solution on  BASE SYSTEM DEVICE with yellow exclamation mark () 


Ricoh 5-1 Card Reader Driver here (ver 6.10.01.03  for 32/64 bit Win7)


TOUCHPAD DRIVER


Synaptics TouchPad here (ver 16.0.1.0  for 32/64 bit Win7)

Note:
By default is enabled Two - Finger Scrolling. If you want to use only one finger for scrolling then check the link below:


ONLY IF YOUR MODEL HAS:  WEBCAM 


Cyberlink YouCam here (ver 2.0.3115  for 32/64 bit Win7)

Note:
If you have any problem with your webcam then check below links to HP documents:


3VRX (optional software)
on-screen visuals and associated sounds that are displayed and heard when adjusting volume


3VRX here (ver 2.5 for 32/64 bit Win7)

Note:
Here is YouTube video which shows what can be done with this software.


ONLY IF YOUR MODEL HAS:  FINGERPRINT READER


1. Uninstall all previous fingerprint reader drivers and software

       Check below guide how to do it (this is not standard uninstallation process):


2. You may install now correct fingeprint reader driver and software.

       There are available two applications to this device:

        - AuthenTec TrueSuite

       and

       - DigitalPersona Personal (recommended).

       Information on how to install both softwares you will find in below guides:


ONLY IF YOUR MODEL HAS: DVD DRIVE WITH LIGHTSCRIBE


How can you check is your DVD drive with Lightscribe?
On DVD panel there will be Lightscribe logo.
LightScribe Host Software here (ver 1.18.22.2   for 32/64 bit Win7)

Resetting and Unlocking a Nintendo DSi Parental Control Lock

So I inherited a nintendo DSi, and it had a parental lock code on it. I tried to brute force either the unlock code or the security question, but no luck. So I turned to Google and found this :
Wii Parental Control password reset tool .

Yes, it does say it is for the Wii, but Nintendo uses the same algorithm for the DSi.

To reset the Parental Control Lock for the Nintendo DSi
Go to:
System Settings -> Parental Controls -> Yes Change Parental Controls -> Pin I forgot -> security question I forgot ->  Get the Inquiry Number and write it down

Go to http://wii.marcansoft.com/parental.wsgi 
And enter the Inquiry Number as the Confirmation Number
And select the date that the DSi is currently set to.

This gives you an unlock code and you can enter it into the next screen on the DSi
Go back to the DSi and hit OK

Enter the unlock code and you will have access to the parental control panel where you can edit the PIN or turn it off completely.

Here is the code that actually calculates the algorithm, thought it was neat to see how the website works :

 #!/usr/bin/python  
# Wii parental control password reset tool
#
# Copyright 2008-2009 Hector Martin Cantero <hector@marcansoft.com>
#
# This program is free software; you can redistribute it and/or modify
# it under the terms of the GNU General Public License as published by
# the Free Software Foundation; version 2 or version 3 of the License.
#
# This program is distributed in the hope that it will be useful,
# but WITHOUT ANY WARRANTY; without even the implied warranty of
# MERCHANTABILITY or FITNESS FOR A PARTICULAR PURPOSE. See the
# GNU General Public License for more details.
import time, urlparse
def application(environ, start_response):
start_response("200 OK", [("Content-type","text/html")])
yield """<!DOCTYPE html PUBLIC "-//W3C//DTD XHTML 1.0 Strict//EN" "http://www.w3.org/TR/xhtml1/DTD/xhtml1-strict.dtd">
<html xmlns="http://www.w3.org/1999/xhtml" xml:lang="en" lang="en">
<head>
<title>Wii Parental Control Password Resetter</title>
<meta http-equiv="Content-Type" content="text/html; charset=UTF-8" />
<style type="text/css">
.title {
font-size: 18pt;
font-family: sans-serif;
}
.response {
font-size: 16pt;
font-family: sans-serif;
}
.error {
color: red;
font-size: 16pt;
font-family: sans-serif;
}
</style>
</head>
<body>
<div class="title">Wii Parental Control password reset tool</div>"""
uri = environ["REQUEST_URI"]
qs = urlparse.urlparse(uri).query
form = urlparse.parse_qs(qs)
ctime = time.time()
def opt_date(delta):
t = time.gmtime(ctime + delta * 3600 * 24)
if delta == 0:
selected = ' selected="selected"'
else:
selected = ""
return '<option value="%02d%02d" %s>%s</option>'%(t.tm_mon,t.tm_mday,selected,time.strftime("%a, %d %b %Y",t))
class CRC32:
def __init__(self):
self.gentable()
def crc32(self, input, crc=0xffffffffl):
count = len(input)
i = 0
while count != 0:
count -= 1
temp1 = (crc >> 8) & 0xFFFFFF
temp2 = self.table[(crc ^ ord(input[i])) & 0xFF]
crc = temp1 ^ temp2
i += 1
return crc
def gentable(self):
self.table = []
for i in range(256):
crc = i
for j in range(8):
if crc & 1:
crc = (crc >> 1) ^ 0xEDB88320l
else:
crc >>= 1
self.table.append(crc)
def error(s):
return '<div class="error">%s</div>'%s
def process():
try:
int(form["number"][0]) #validate
if len(form["number"][0]) != 8 or not all([x in "0123456789" for x in form["number"][0]]):
raise ValueError()
except:
return error("Please provide a valid 8-digit confirmation number")
try:
int(form["date"][0]) #validate
if len(form["date"][0]) != 4 or not all([x in "0123456789" for x in form["date"][0]]):
raise ValueError()
except:
return error("Invalid date")
fullnum = form["date"][0] + form["number"][0][4:8]
crc = CRC32().crc32(fullnum)
code = ((crc ^ 0xaaaa) + 0x14c1) % 100000
return '<div class="response">Your unlock code:<span class="code">%05d</span></div>'%code
if form.has_key("submit"):
yield process()
yield """
<div class="form">
<form action="/parental.wsgi">
<p>Confirmation Number:
<input name="number" type="text" size="9" maxlength="8" value="" /></p>
<p>Current Date in your timezone:
<select name="date" size="1">"""
yield opt_date(-1)
yield opt_date(0)
yield opt_date(1)
yield """</select><br /></p>
<p><input name="submit" type="submit" value="Get Reset Code" /></p>
</form>
</div>
<p>
<a href="http://validator.w3.org/check?uri=referer"><img
src="http://www.w3.org/Icons/valid-xhtml10-blue"
alt="Valid XHTML 1.0 Strict" height="31" width="88" /></a>
<a href="http://jigsaw.w3.org/css-validator/">
<img style="border:0;width:88px;height:31px"
src="http://jigsaw.w3.org/css-validator/images/vcss-blue"
alt="Valid CSS!" />
</a>
<br />
<a href="parental.txt">Source code</a>
</p>
</body>
</html>"""

Saturday, November 24, 2012

How to play GameCube games off a USB HDD.

You will need:
-An SD Card
-A USB HDD
-Wii Mote
-GameCube Controller
-A Wii with Homebrew Channel installed
-A GameCube iso


Download Links:
USB Loader: http://code.google.c...e+DownloadCount
USB Loader Mod: http://www.mediafire...b545893im623q25
DIOS MIOS v2.0 or newer: http://code.google.com/p/diosmios/
DiskEx: http://code.google.c...-v0.8b-cred.rar
EaseUS: http://download.cnet...4-10863346.html
MMM: http://www.4shared.c...od-Manager.html

COMPUTER:


1.) Download the USB Launcher easy installer from the Download List above. Run the easy installer in the folder, put it on your SD Card.

2.) Download the USB Loader mod. Open the zip file. Choose the folder with your right IOS. Extract the boot.dol to SD:\apps\usbloader_gx\

3.) Download the DIOS MIOS v2.0 wad. Move it to the root folder of your SD card, or for easier installation put it in a folder on the root titled 'wad'. Also download and put MMM in your 'apps' folder.

4.) Download DiskEx and put the zip contents on your Desktop, along with your iso. (To get a backup, use CleanRip.)

5.) Drag n' Drop the iso into DiskEx. It will create a folder on your Desktop. It will create a folder named after the game id. So to you, it's random letters and numbers.

7.) Download and Install EaseUS Partition master, and open it. Find your HDD, and right click it, and select 'format' Format it as FAT32 with 32KB Clusters. *DONT IGNORE! Press OK, and then "Apply" .

8.) Look at your empty HDD, and make a 'games' folder. Put the Folder with the Game ID in there.

WII:
1.) Plug in your HDD in USB Slot 0. Turn on your Wii. Launch Homebrew Channel. Then launch MMM.

2.) Choose WAD Manager on the menu and install DIOS MIOS v2.0.wad

3.) After you're done, exit MMM. Launch USB Launcher GX.

4.) Go to Settings, and on Page 2, select Custom Paths.

5.) Make the Path for Main GameCube Games "usb1:\games\"

6.) Go to your menu, and select the Button on top that shows a menu that has Check Boxes saying GameCube, Wii, NAND, and EmuNAND. Choose GameCube, and any other you want to display.

7.) Choose a game and press Start, then choose 'Launch from USB'.

Congratulations! You can now play GC games from your USB HDD. This only works if you have a Disc in the Wii Disc Drive. Thanks to Cyan for the modified USB Loader.


CFG USB LOADERv70 r36:

COMPUTER:
Follow steps 3-7 in the COMPUTER guide above. 

WII:

1.) Follow steps 1 & 2 on the guide above.
2.) Install DIOS MIOS using MMM.
3.) Launch CFG USB Loader.
4.) Click the icon with tools on it
5.) Set "DML Version" to DM.
6.) Launch your game!

Sunday, November 11, 2012

Hiding Facebook Sidebar Ticker with AdBlock


As usual, Facebook introduced a few interface changes that most users have found unnecessary or worse, annoying.  Fortunately, for those of us who use good browsers such as Chrome or Firefox, we have AdBlock at our disposal.  AdBlock (and AdBlock Plus) block common ads on many web pages.  Fortunately, we are able to block additional page elements ourselves.  Enter the two following lines in AdBlock Plus (code courtesy Facecrooks website):
apps.facebook.com##DIV[class="homeFixedTicker"]
apps.facebook.com##DIV[class="fixedAux"]
Remember to save your filter changes, then reload the page to view without the annoying tickers.
If you want to take this even further, I created two filters that will eliminate the entire distracting righthand sidebar, including the ads and “suggestions” Facebook offers!  In AdBlock, enter this as two separate lines in your custom filter list:
facebook.com##div[class="UIStandardFrame_SidebarAds"] 
facebook.com##div[id="rightCol"][role="complementary"]
Save your changes, reload your Facebook page, and that righthand sidebar should be gone!
Here is another snippet you can use in AdBlock to remove that chat tab at the bottom of your screen.  Be aware, however, that this will no longer give you an indication that you are signed into chat (although I stay logged out at all times anyway)…
facebook.com##div[class="fbDock clearfix"]
Again, remember to save your changes, and reload the page.

Saturday, November 3, 2012

USB, Meet Gameboy: Saving your Pokemon, Photos & Memories


Backing up GameBoy saves to Your PC
(A YouTube video briefly highlighting the process)
If you were a kid growing up in the mid 90′s there was probably a good chance you had a GameBoy from Nintendo. Most early games did not allow you to save your progress, alternatively a password system was used to pickup where you left off. But in 1998 a big game came along that used the save function, and it wouldn’t have been a success without it. That game of course was Pokemon, available originally in the United States in a Red or Blue version this game would go onto break records and hypnotize millions of kids into becoming Pokemon fanatics for life.
Growing up I was always a bit of a geek, so one day I found a device in a store titled the “Mega Memory Card” made by the now defiant company Interact. I just had to have it. This strange shaped yellow device almost looked like a Game Shark, but instead of hacking your games and giving you infinite lives, this device let you backup your game saves. The Mega Memory card had 30 available slots. Meaning I can backup my Pokemon game, erase the save file and let my brother play and restore my original game at anytime. As well as having alternate saves for a variety of games. This was really cool and I loved it. But until recently there was no easy way to get these saves onto your computer or into an emulator to really preserve it forever. There were other devices that were based on the use of the old Parallel port standard, but thankfully those days are behind us.
Enter the GB USB 64m Smart Card. This is basically a blank GameBoy cartridge with internal built-in storage and a USB port. This allows you to copy gamesaves and more from a GameBoy game to your computer! Finally allowing you to really preserve your gamesaves and other data forever. GameBoy games that involve saves run on a battery. Once this battery dies your save file is lost forever. For example most games are losing their saves recently, that’s because these batteries don’t last forever. For example Pokemon Red came out in 1998 and that game is now over 13 years old. Meaning the battery is over 13 years old. While it may still work now, the time is ticking on when the battery will finally fail. Better safe then sorry right? My Pokemon Red game just stopped working, a failure much larger then the battery was the cause I’m afraid. Thankfully years ago I made a backup using my Mega Memory Card. So this really pushed me to finally back these up to a computer once and for all. The save files are small and portable. I backed up over 60 saves to my computer (yes it took a long time), but the .zip file with them was only about 3 MB. So it’s really easy to back these up and keep them somewhere safe forever. Using a Gamil account and emailing them to yourself is a good option…
Anyway, here is how you backup your games. You’ll need all the items pictured at the top which include: The now out-of-print Mega Memory card. A game of your choice you wish to backup (in this case Pokemon Red) and a GM 64m Smart Card which is thankfully available for sale here.
First you need to download the software on the GM 64m Smart Card page (linked above). For 64-bit users of Windows this is a bit of a pain, but it does work. I’ve successfully installed the drivers and software on Windows 7 64-bit and Windows XP (32-bit). Needless to say a 32-bit version of Windows is easier to get this to work on. There are Mac & Linux options, but even though I’m using a Mac I took the shortcut of using Parallels Desktop with Windows instead of attempting the native-Mac route.
Step 1: Using your Mega Memory card to backup the save. Plug the Mega Memory card into your GameBoy system, plug the cartridge you want to backup into the slot on the unit, for this example Pokemon Red. Make sure the switch ont he Mega Memory card is slid into the right side position (with the label facing away from you). So if you look at the purple label the switch should be on the left position). But from the back of the Gameboy it’ll be on the right side.
Step 2: Turn on the Gameboy. If the Memory Card manager screen does not come up clean your game contacts of dust. This is a major factor in making this work smoothly, I have dumped games which did not have a working save, this was due to there not being a secure connection. So try again until the menu comes up. Once you get to the menu select ‘Backup’. You will be given a chance to type a title or name for your save. A screen saying “Working” will let you know it’s backing up the game save. This will only take a few seconds. If you’re backing up a GameBoy camera this will take significantly longer, maybe around 10-20 seconds, but more on the GameBoy camera later.
Step 3: Once the ‘Working’ screen goes away it is safe to shut-off the system. Remove the game you copied the save from (ex. Pokemon Red) from the back of the Memory Card unit. Now plug in the GM 64m Smart Card. Turn on the system again and wait to get to the Memory Card menu. Again if it does not boot up correctly clean the game contacts. Now this time we choose ‘Restore’ since we want to write the save information we just backed up form the Pokemon game. Select the name of the save you created before. A ‘Working’ screen will again come up to let you know it’s working. When it’s done it’ll return to the main menu, this means it’s finished. It’s now safe to turn off the Gameboy.
Step 4: Thanks to the nature of USB you can disconnect the GB 64m Smart Card from the Memory card/ gameboy all together and plug it into your computer via the USB port on the cartridge. Note: If you leave the cartridge plugged into a GameBoy (even if it’s off) it will not be read properly by the computer. So remove the cartridge from any connection before continuing. Start up the GB_USB.exe application in Windows. The screen will indicate it’s loading. The program has two sections, one to save data to the card, and one to read data from the card (the bottom). We’ll be focusing on the bottom section. Game Card Information. Please note there are two 32M Slots/Pages. If you do not see anything listed under ‘Game Name’ you should change the Data page from the drop-down menu on the upper section. Changing this to Page NO. 2 solved the issue for me. You should now see something listed on the bottom section under Card Information. On my screen it reads ‘ADVENTURE’ with a size of 256k. This may vary depending on your game. Now to copy this to your PC. Since we’re copying just game saves and not a ROM, we’ll select the ‘READ SRAM’ button. You will be asked to save your game file somewhere, be sure to add a .sav extension or your GameBoy emulator will not properly read the save file. This will show a progress bar backing up your info. When it’s done it’s safe to close the program and unplug the cartridge from the USB port.
Step 5: Playing your save file on an emulator. First you need the ROM of the original game. I won’t get into the whole legal issues with this, but depending on your country it technically may be illegal to obtain or own these ROMs unless you own them. Google CoolRom to find out some information. Do not ask me where to download them. So now that you have the ROM of the game you downloaded the game save from we’re ready to go. On Windows I used VisualBoy Advance, a pretty good GameBoy emulator which emulates GameBoy, GameBoy Color and GameBoy Advance games very well. Start by selecting ‘File > Open…’ and select the game ROM (for example Pokemon Red). The game will load and start to play, don’t worry about this. Once again go to the File menu, but this time go to ‘Import’ and select ‘Battery file’. The battery file is the save file we downloaded form our USB cartridge. Make sure the file has the extension .sav (for example “MyRedGameSave.sav”). If not the program will not see it as a save file and it may not work. Select your save. The program will warn you that loading the save will cause the current game to reset and lose any unsaved data. This is just fine because we just started the game. Click OK and watch the game reboot… TA-DAH! You now have your gamesave loaded into an emulator. Your game save can be emailed to yourself, backed up, or shared online. It will live on forever!
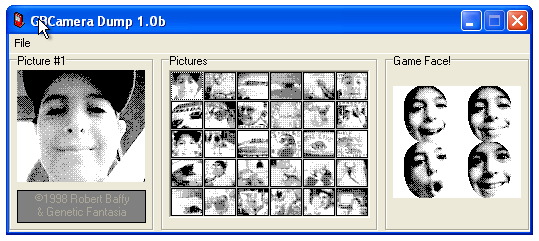
Note about GameBoy Camera saves. Using the above method I was able to save my GameBoy camera photos. But not without a bit of a struggle. Hopefull the below notes will help you out. First this website was crucial. It follows the same process above but gives you a download link to the GBCameraDump.exe program, without this it’s not possible to view your photos. Especially since most emulators (like VisualBoy Advance) won’t read a GameBoy Camera save file because it can not properly load up the GameBoy Camera ROM file.
So please visit this wonderful site to start the process, but before doing so I have some helpful tips to ensure a smooth operation!
This is the result of a bad dump of a GameBoy Camera save file.
This is the result of a good dump of a GameBoy Camera save file.
Clean the contacts on the GameBoy camera! The camera will not easily slide onto the Mega Memory card. It can work, but it is a bit snug. This causes the game to be extra sensitive, so there’s a higher chance of it not backing up properly. I tried twice and I got gibberish photos (although my Game Face was okay). To fix this I cleaned all cartridges and slots with a Q-Tip (without anything on it, but you can go further, just be careful). Finally on my 3rd try everything worked okay. The key to this is the transfer times. The Mega Memory Card will take it’s sweet time to backup the GameBoy camera save. That is normal. However when ‘Restoring’ this save to the GM 64m Smart Card is where I was having the issue. The Mega Memory card would often take no time to restore the save to the card. And that is when I was getting zero usable pictures when opening the GBCameraDump.exe program. To fix this I formatted the GM 64m Smart Card (using the GB_USB.exe utility) and tried again. This time it worked great. So it may have been a combination of dust and formatting. This time the Mega Memory card took the same amount of time to backup the Camera save as it took to restore it to the USB card. All worked well and GBCameraDump.exe was able to save all of my photos into crisp Black & White .BMP image files. So don’t give up, it’ll work eventually! :)